Using Sqlite3 as an external database
External database introduction using Sqlite3
Unlike IndexedDB, Sqlite is a relational database. This means that you can link multiple tables correctly. If you have the type of data that fits a relational database model, using Sqlite is better than using IndexedDB (even with Dexie.js).
What is a relational database?
As a simple example of data that fits a relational database model, consider a business that sells product and/or services. For such a business, you would have a bare minimum of three tables:
-
Customers
-
Products
-
Sales
In a relational database, you have a separate table for each different entity. For a business, a customer is an important entity and a product is an important entity. They are clearly not the same kind of entity. So, you have a table for both customers and products. In addition, you want to keep track of which customer bought which product. This is where the sales table comes in, as it is the table that links or connects the customers table to the products table. This is oversimplified compared to an actual relational database, but this should give you an idea of what a very simple relational database might look like.
For illustrative purposes, let’s work with some sample data. Let’s suppose that a business sells books and wants to keep track of which customer bought a particular book. Suppose the person storing the data did not know about relational databases, and used a spreadsheet like this:
| First Name | Last Name | sex | Title | Author | Price |
|---|---|---|---|---|---|
Jane |
Doe |
female |
The Cat in the Hat |
Dr. Seuss |
6.95 |
Jane |
Doe |
female |
Go Dog Go |
P.D. Eastman |
7.89 |
John |
Doe |
male |
The Cat in the Hat |
Dr. Seuss |
6.95 |
John |
Doe |
male |
Prey |
Michael Crichton |
8.99 |
Of course, this is a very limited amount of data. So, use your imagination to envision many customers, many books, and many sales. Even with this limited amount of data, consider the customer Jane Doe. Her information will be repeated on every row that she has purchased a book. Consider the book, The Cat in the Hat. That book’s information will be repeated every time that book is sold. So, using a single table results in potentially a lot of duplicate data. This is not memory efficient, but becomes problematic to maintain. What if Jane Doe gets married and her last name changes to Smith. You have to find every row that has her name and make this change. If you decide to drop a customer, you have to delete every row of the table that this customer was on. That kind of thing would be hard to maintain if you have a large amount of data.
Consider how this might be done in a relational database.
| id | First Name | Last Name | sex |
|---|---|---|---|
1 |
Jane |
Doe |
female |
2 |
John |
Doe |
male |
| id | Title | Author | Price |
|---|---|---|---|
37 |
The Cat in the Hat |
Dr. Seuss |
6.95 |
63 |
Go Dog Go |
P.D. Eastman |
7.89 |
112 |
Prey |
Michael Crichton |
8.99 |
| customer_id | book_id |
|---|---|
1 |
37 |
1 |
63 |
2 |
37 |
2 |
112 |
As, you can see, there is no duplicate data. If Jane Doe changes her name to Jane Smith, only one record needs to be updated. If a customer was deleted, then the constraints set up for a relational database would also remove the sales records that had that customer’s id. So, for this type of data, a relational database has been the standard way to store the data.
Basic SQL commands to create database tables and insert data
Relational databases use the Structured Query Language (SQL) to create a database, create tables for that database, and manage all the data stored in those tables. A good introductory reference to SQL can be found at w3schools SQL tutorial. That is a good site to learn how to use the basic syntax and commands for SQL.
One way to learn SQL is to just build a simple functional database. That is what we will learn about here. SQLite is one of the most popular database management systems (DBMS sytems). This is partly because it is free to use and does not have complex storage requirements. You have probably made use of a database that is built using SQLite, since it is built into cell phones and used in many commonly used applications. Therefore, it is a good DBMS to get some experience with.
Using an online SQL application
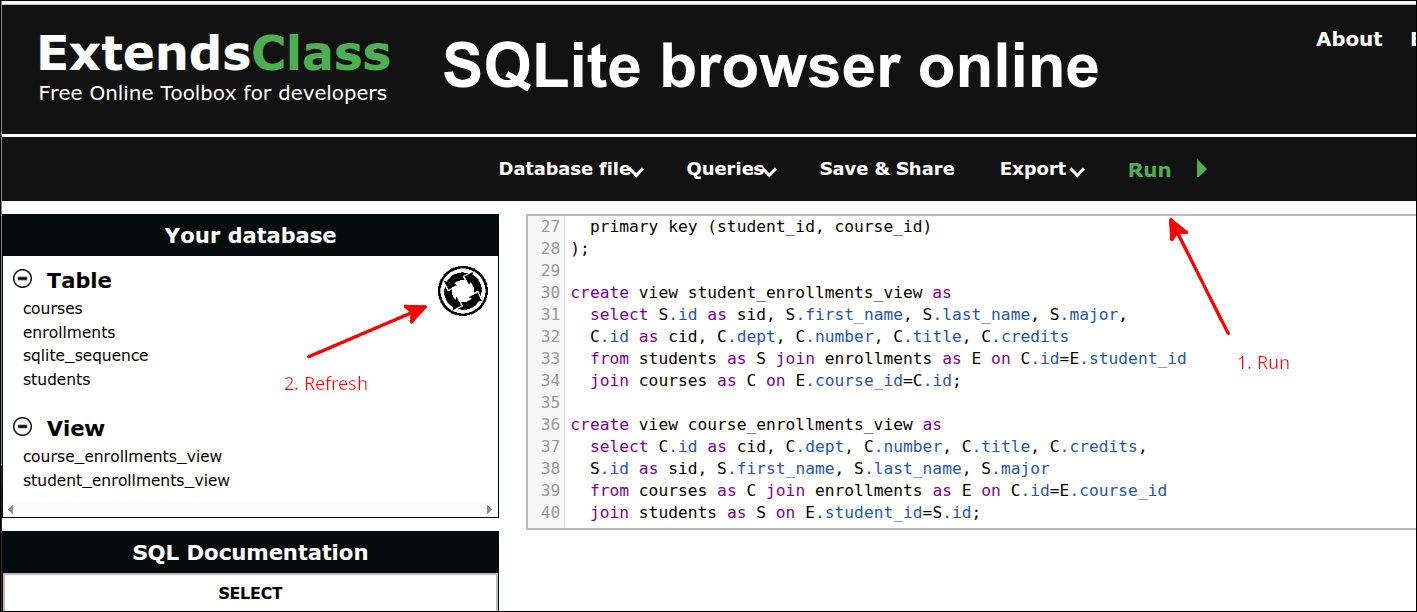
A very useful online SQL application can be found at ExtendsClass SQLite browser online. We can learn all the basic SQL commands here, and even create a SQLite database that can be saved and used by any applications that can open SQLite database files.
The CREATE command
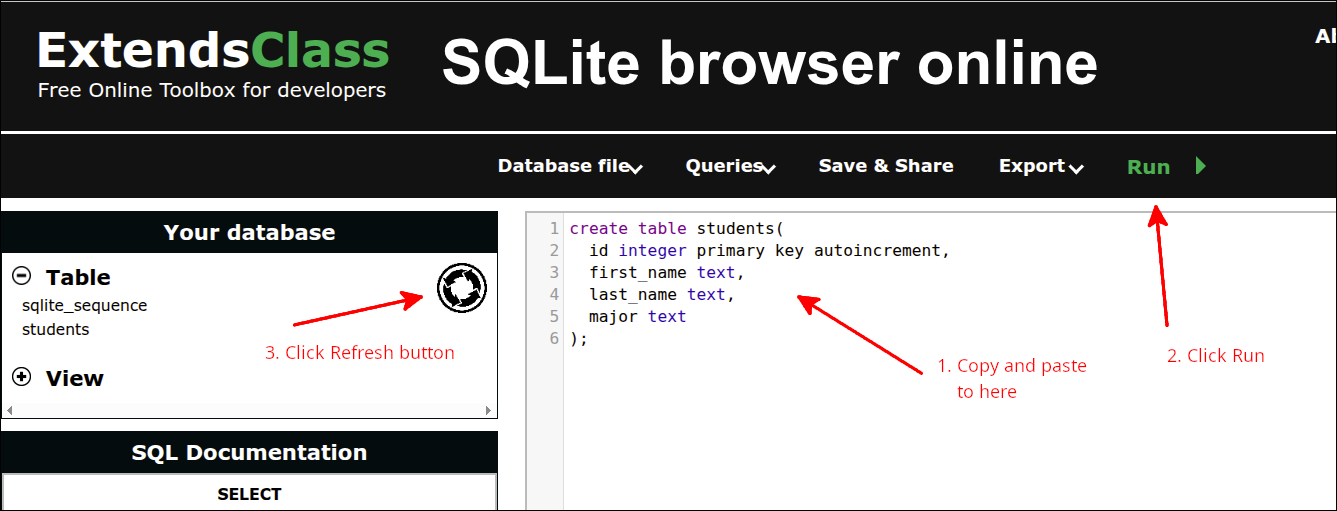
In a relational database, we will store data in tables. So, a good place to start is with the create command. Let’s create some tables that will hold data that is like the data we used in the last lesson Building an Application using Dexie.js. Here is how we can create the students table. We will put these commands into a file called init.sql:
create table students(
  id integer primary key autoincrement,
  first_name text,
  last_name text,
  major text
);
Lines 1-6 define our create table command. Line 1 declares students to be the name of this table. Line 2-5 define the fields (properties) for that table. We can go to the online SQLite editor from the link above and copy and paste this command into the text area. Then, we can click on Run to run this SQL command. Click on the Refresh button to show that the table has been created.
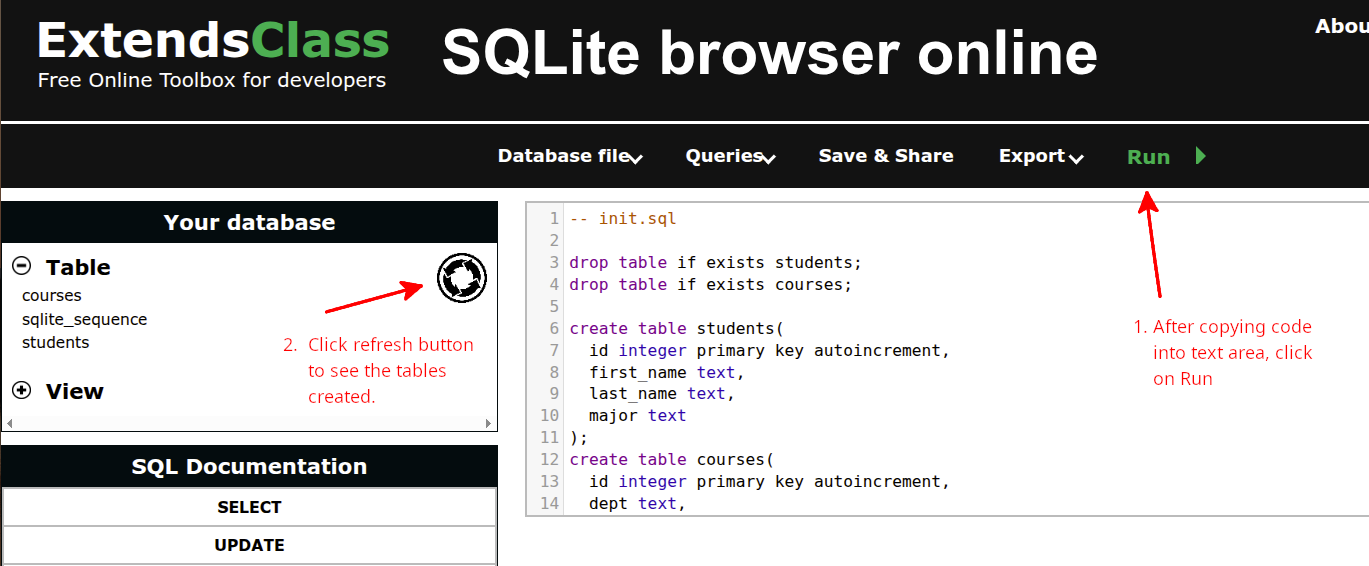
As you can see, the students table has been created. Let’s modify init.sql to make it so that we always start with empty tables, and add the courses table too. Here is the next version of init.sql:
-- init.sql

drop table if exists students;
drop table if exists courses;

create table students(
  id integer primary key autoincrement,
  first_name text,
  last_name text,
  major text
);
create table courses(
  id integer primary key autoincrement,
  dept text,
  number text,
  title text,
  credits integer
);
The new lines are 1, 3-4 and 12-18. Line 1 is just a comment stating the name of this file. The -- (two hyphens) is the way you can make it so that the SQL engine ignores everything after those marks on a line. Line 3 and line 4 will drop the students and courses table respectively. Note the use of the ` if exists ` clause. This is needed to avoid an error if those tables don’t exist yet. Since we can run this kind of SQL script, this kind of clause prevents the scripts from finishing execution.
Lines 12-18 are the lines to create the table courses. Lines 13-17 define the fields (properties) for the courses table. The following screen shot shows the result of running init.sql again:
Let’s talk about the field data types. Although there are a number of possible data types for fields, the most common data types are integer and text. A data type of integer is used to constrain that field to store only integer values. This is commonly used for id numbers and for fields that store counts of things. A data type of text is used to store strings. You may find some older references online using data types like varchar(n) instead of text. But, most modern databases use text instead. This makes it so that you don’t have to specify the size of the field. So, something like varchar(20) meant using a variable length string of up to 20 characters. As you can see, it is easier and preferable to just use text.
So, for the id fields in both tables and credits in the courses table, we can only store integer values in those fields. For all the other fields that are declared as text, those will store string values.
Making this a truly relational database
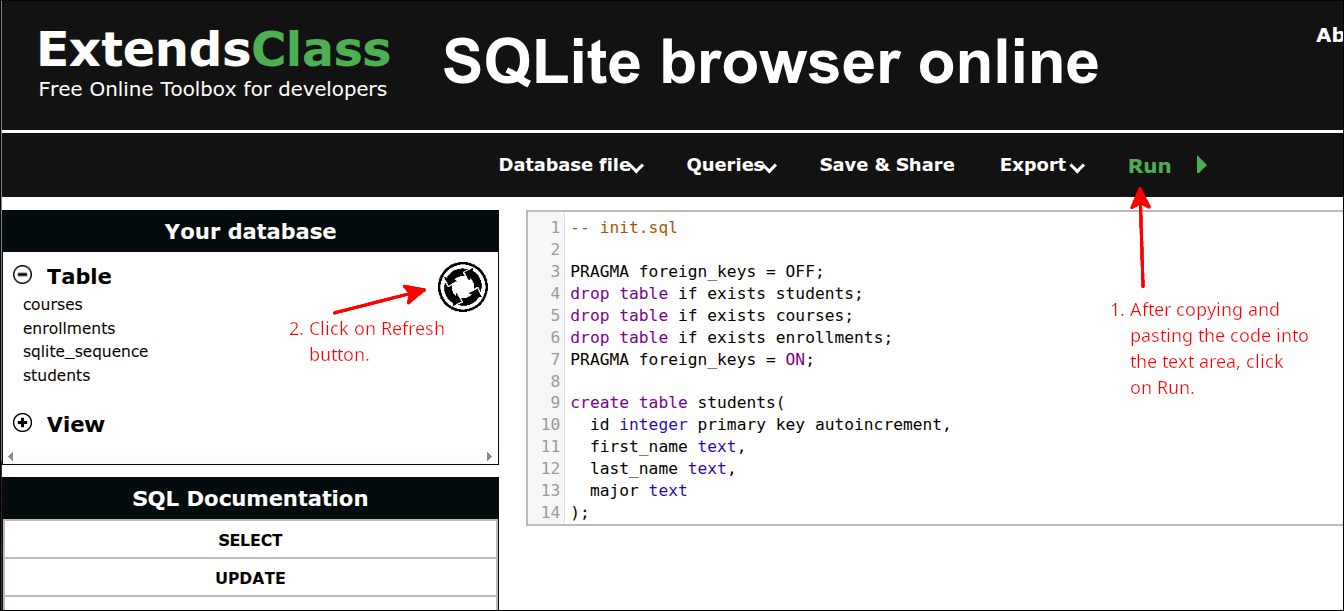
Let’s modify init.sql so that this becomes a truly relational database. That is, we will define the enrollments table that is used to relate (or link) the students and courses tables together. Here is the new version of init.sql:
-- init.sql

PRAGMA foreign_keys = OFF;
drop table if exists students;
drop table if exists courses;
drop table if exists enrollments;
PRAGMA foreign_keys = ON;

create table students(
  id integer primary key autoincrement,
  first_name text,
  last_name text,
  major text
);
create table courses(
  id integer primary key autoincrement,
  dept text,
  number text,
  title text,
  credits integer
);
create table enrollments(
  student_id integer references students(id),
  course_id integer references courses(id),
  primary key (student_id, course_id)
);
The new lines are 3, 6-7 and 22-26. Line 3 turns the foreign key constraints off. Normally, this would prevent dropping the tables in any order. You would have to drop the enrollments table first, as that depends on both the students and courses tables. But, with foreign key constraints off, you can drop the tables in any order. Line 6 adds the statement to drop the enrollments table if it exists. Line 7, turns foreign key constraints back on. So, while in the same session, you would not be able to insert a record into the enrollments table that had either a student_id or a course_id that did not have a corresponding entry in the students and/or courses table.
Lines 22-26 are the commands to create the enrollments table. Line 23 declares student_id as an integer that has a foreign key constraint that requires the value for student_id to be an id in the students table. Line 24 declares course_id as an integer that has a foreign key constraint that requires the value for course_id be an id in the courses table. These foreign key constraints prevent entering an enrollments record that has values for either student_id or course_id that don’t have corresponding entries in the respective students and courses tables.
Here is a screen shot showing the result of running the new version of init.sql:
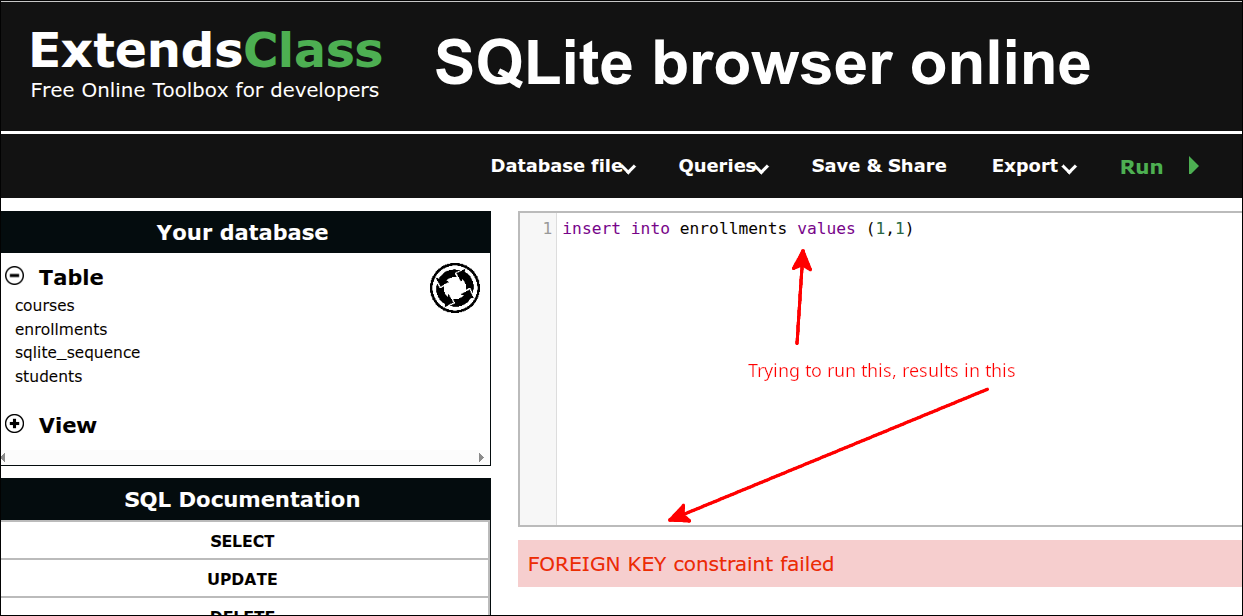
Within that same session, trying to insert into enrollments a record like (1,1) will be prevented as shown in the following screen shot:
Adding views
For a relational database, views are used to join related tables together to make it easier to query the related tables. Suppose we wanted to run a query that returns all the courses that a student is enrolled in. Here is how you might do that.
select S.id as sid, S.first_name, S.last_name, S.major,
  C.id as cid, C.dept, C.number, C.title, C.credits
  from students as S join enrollments as E on S.id=E.student_id
  join courses as C on E.course_id=C.id where sid = 1;
That would return records that would have the student’s id, first_name, last_name, major and the course’s id, dept, number, title and credits where the student’s id is 1. So, we would create a view that is defined this way:
create view student_enrollments_view as
  select S.id as sid, S.first_name, S.last_name, S.major,
  C.id as cid, C.dept, C.number, C.title, C.credits
  from students as S join enrollments as E on S.id=E.student_id
  join courses as C on E.course_id=C.id;
Then, to perform the earlier query, you would do this:
select * from student_enrollments_view where sid = 1;So, let’s add views to our init.sql:
-- init.sql

PRAGMA foreign_keys = OFF;
drop table if exists students;
drop table if exists courses;
drop table if exists enrollments;
drop view if exists student_enrollments_view;
drop view if exists course_enrollments_view;
PRAGMA foreign_keys = ON;

create table students(
  id integer primary key autoincrement,
  first_name text,
  last_name text,
  major text
);
create table courses(
  id integer primary key autoincrement,
  dept text,
  number text,
  title text,
  credits integer
);
create table enrollments(
  student_id integer references students(id),
  course_id integer references courses(id),
  primary key (student_id, course_id)
);

create view student_enrollments_view as
  select S.id as sid, S.first_name, S.last_name, S.major,
  C.id as cid, C.dept, C.number, C.title, C.credits
  from students as S join enrollments as E on C.id=E.student_id
  join courses as C on E.course_id=C.id;

create view course_enrollments_view as
  select C.id as cid, C.dept, C.number, C.title, C.credits,
  S.id as sid, S.first_name, S.last_name, S.major
  from courses as C join enrollments as E on C.id=E.course_id
  join students as S on E.student_id=S.id;
The new lines are 7-8, 30-34 and 36-40. Line 7 will drop the student_enrollments_view if it exists. Line 8 will drop the course_enrollments_view if it exists. Line 30-34 will create the student_enrollments_view. Note that we are using aliases. So this means that we can use S as an alias for the students table. On line 33 when we use from students as S, this makes S the alias for students. Similarly, we can use C for courses by making the statement join courses as C on line 34. Also, we make an alias for enrollments with the statement join enrollments as E. So, E can be used instead of enrollments. In addition, we use two more aliases. On line 31 we have select S.id as sid. This means that sid is an alias for students.id. On line 32, we have C.id as cid. This means that cid is an alias for courses.id. These last two aliases are required because both the students table and the courses table have a field with the same name, id. Lines 36-40 create the course_enrollments_view in much the same manner as line 30-34 create the student_enrollments_view.
The following screen shot shows the result of running init.sql now.
Notice how this application shows the views that have been created as well as the tables.
Loading initial data
Now that the tables are created, we can make a SQL script that can load some initial data into the tables. Here is the script, load_init_data.sql:
-- load_init_data.sql

insert into students (first_name, last_name, major) values
  ('Jane', 'Doe', 'MATH'),
  ('John', 'Doe', 'CHEM'),
  ('Alice', 'Brown', 'BIOL'),
  ('Mason', 'Jones', 'MATH'),
  ('Mary', 'Rogers', 'CHEM'),
  ('Carol', 'Greene', 'BIOL'),
  ('Jill', 'Manning', 'CHEM'),
  ('George', 'Hill', 'MATH'),
  ('Alicia', 'Smith', 'CHEM'),
  ('Robert', 'Cook', 'BIOL');

insert into courses (dept, number, title, credits) values
  ('BIOL', '100', 'Intro to Biology', 3),
  ('BIOL', '200', 'Biology II', 4),
  ('CHEM', '100', 'Intro to Chemistry', 3),
  ('CHEM', '110', 'Chemistry for Non-majors', 3),
  ('MATH', '110', 'Math for Non-science majors', 3),
  ('MATH', '205', 'Calculus I', 4),
  ('MATH', '205a', 'Calculus for Chemistry majors', 4),
  ('MATH', '205b', 'Calculus for Biology majors', 4),
  ('MATH', '206', 'Calculus II', 3),
  ('ENG', '100', 'Expository Writing', 3);

insert into enrollments (student_id, course_id) values
  (1, 1),
  (1, 4),
  (1, 6),
  (1, 10),
  (2, 1),
  (2, 3),
  (2, 7),
  (3, 2),
  (3, 4),
  (3, 8),
  (3, 10),
  (4, 1),
  (4, 4),
  (4, 6),
  (5, 1),
  (5, 3),
  (5, 7),
  (5, 10),
  (6, 2),
  (6, 4),
  (6, 8),
  (6, 10),
  (7, 1),
  (7, 3),
  (7, 7),
  (8, 1),
  (8, 4),
  (8, 6),
  (8, 10),
  (9, 1),
  (9, 3),
  (9, 7),
  (10, 1),
  (10, 4),
  (10, 6);
You can copy and paste that data into the text area for the SQLite browser online application and run it. Then, you can run some select queries on that data.
Here are the rows returned when running the query:
select * from students;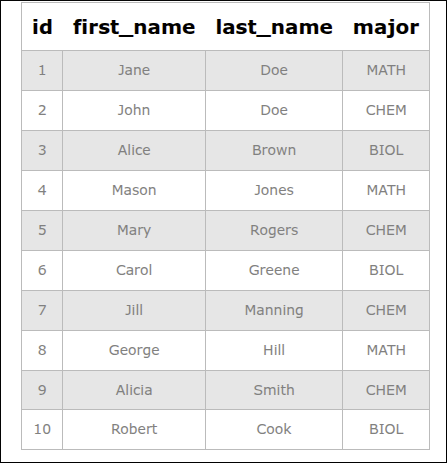
There are 10 rows or records that are returned. Note that the columns correspond to the fields for the students table.
Here is another query:
select * from courses;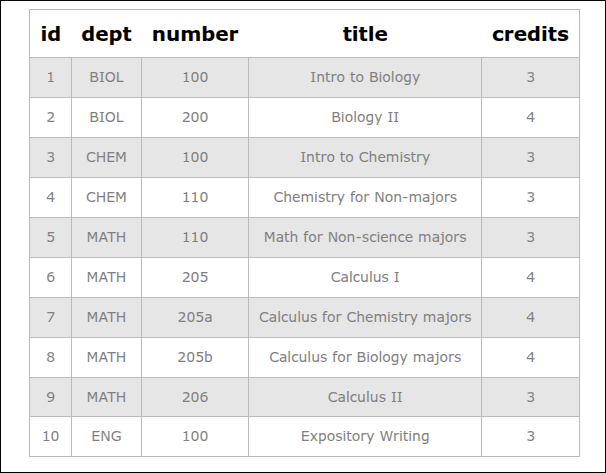
Again, there are 10 rows or records returned. Also, the columns refer to the fields of the courses table.
Here is another query:
select * from student_enrollments_view where sid=2;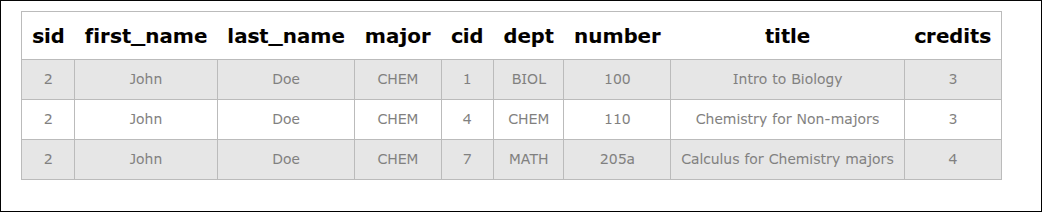
As you can see, John Doe is enrolled in three courses, BIOL 100, CHEM 110 and MATH 205a.
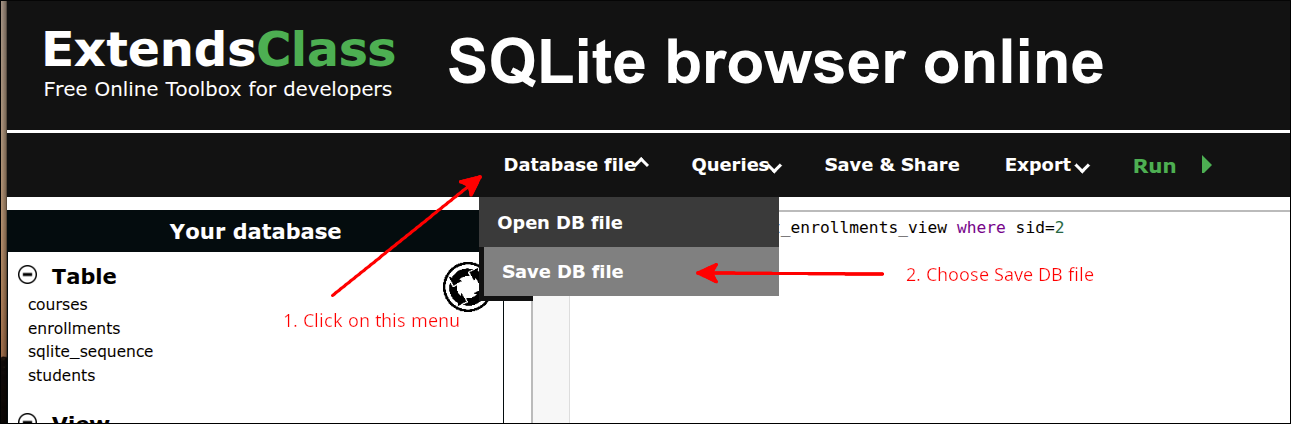
Saving the database
Now that we have the tables created and populated with the tables with initial data, we can save the database. Go to the Database file menu and select Save DB file. Choose the name mydb.sqlite3.
If you just want to download that file, you can get it here: Click to download mydb.sqlite3
Setting up the project
Using an external database means that the web application is significantly more complex than any of the web applications we used in our lessons so far. The set up for this project will make use of more files and folders than used for the previous lessons. We will be able to make use of a number of things that we used in the previous lesson An application using IndexedDB through Dexie.js. But, there will also be some new ideas that we will have to learn and use. Let’s try to get a rough idea of why using an external database is different from what we have been doing. Here is a diagram that shows what is involved with our previous applications:
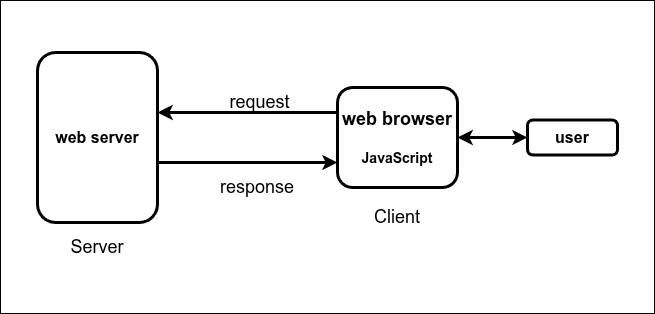
The typical steps involved for this would be:
-
User enters URL for a web page in the web browser.
-
The web browser sends a request to the web server.
-
The web server sends a response that is used to render the web page in the browser.
-
The user interacts with the web page and JavaScript is used to process the interactions.
So, for this kind of process, the web server is mainly responsible for processing the initial request and sending the response back so the web browser can render the web page. Unless the user reloads the web page, the web server just responds to that initial request.
When an external database is involved the process is more complex. Here is a high level diagram of what this process might look like:
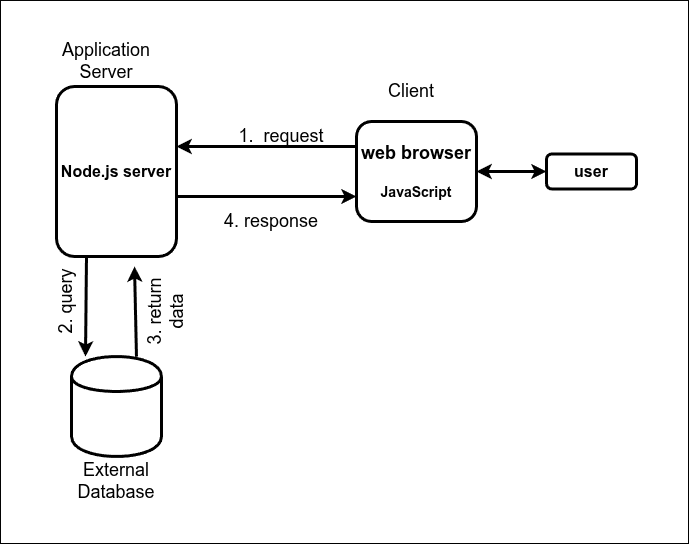
To access the external database, we need to set up a more complex Application Server. This server must be able to perform queries on the database, get the results of that query, and then somehow send a response back to the web browser. So, you can already see that more steps are involved. This diagram is actually greatly simplified. The following diagram gives a little more detail:
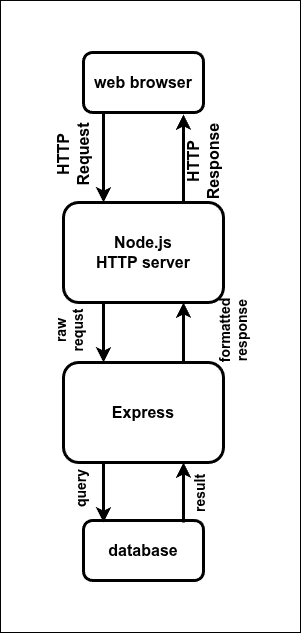
Here are some of the important processes that are going on starting from the request from the web browser, until a response comes back to the web browser.
-
The web browser makes a HTTP request, that gets received by the Node.js HTTP server.
-
The Node.js HTTP server passes that request to Express.
-
Express parses the request from the HTTP server.
-
If the request is for a static file, Express will create the appropriate headers and send the file with those headers to the HTTP server. The HTTP server then sends the response back to the web browser.
-
If the request coming to Express is not for a static file, Express will parse the request and format parts of the request so that the request can be further processed.
-
If the original request has information in the URL, Express will make that information available in req.params. If the original request contains input form data, that data will be placed inside if req.body. Some requests have both types of data.
-
Express establishes routes that determine how the original HTTP requests from the web browser must be formatted. Express will take the data that has been put into req.params and/or req.body and call the appropriate route handler. The route handler is a JavaScript function that is made to specifically interact with the external database.
-
-
-
The route handler called by Express, makes the database query.
-
The database will return the result of the query back to Express.
-
Express will format those results and send this along with the appropriate headers back to the HTTP server.
-
Finally, the HTTP server sends the results back to the web browser where JavaScript is used to make use of those results in the web page.
Actually, the process is more detailed and complex than this description. For example, when Express places the data in req.body, it uses two different kinds of middleware. One type is for urlencoded (form data) and the other type is JSON (for JSON data in the request). This is something that you will see a bit of when we set up the software that is used to configure Express later on in this lesson.
Setting up the project in StackBlitz
We will start off using one of StackBlitz’s popular templates, the JS Vanilla template. This was done in an earlier lesson and can be reviewed here: Starting the lesson in StackBlitz. Here is a summary of the steps:
-
Login to your StackBlitz account.
-
Click on the New project button, and click on the Popular templates.
-
Look for the JS Vanilla template and click on it.
-
Edit the project info and change the Title to using_sqlite3.
-
In the PROJECT area, right-click and delete the src folder. Create the data folder. Move index.html into the public folder. Or, delete index.html and recreate index.html inside the public folder.
-
Inside the public folder create the following files:: index.html (if you have not already created it), app_main.mjs, ui_renderer.mjs and api_client.mjs.
-
Inside the main folder create the files server.mjs and vite.config.js. The main folder should already have the file package.json.
Your PROJECT area should look like this:
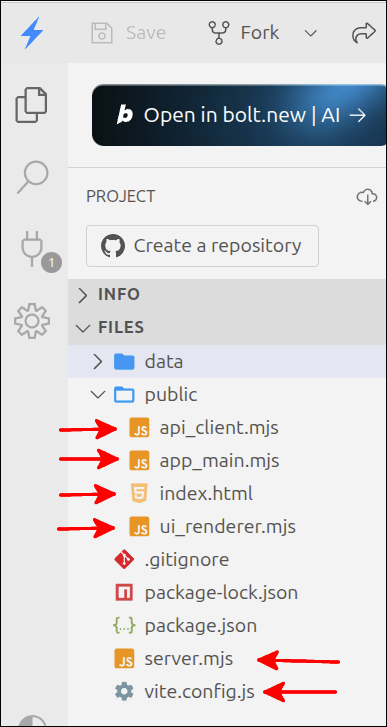
The arrows pointing from the left point to the files we need inside the public folder. The arrows from the right point to the files we add inside the root folder. Also, note that the data folder has been created.
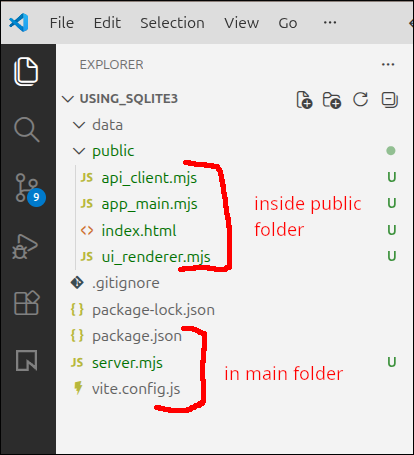
Setting up the project locally using Vite
You can go to your ~/Documents folder and make a directory called using_sqlite3. Then, you could make the same folders and files using VS Code. You can also start this by doing this at the command line. To do this, go to a terminal and run the following commands:
$ cd ~/Documents
$ mkdir using_sqlite3
$ cd using_sqlite3
$ mkdir public data
$ cd public
$ touch index.html app_main.mjs ui_renderer.mjs api_client.mjs
$ cd ~/Documents/using_sqlite3
$ touch package.json server.mjs vite.config.js
If you open the folder ~/Documents/using_sqlite3 in VS Code, you would see this:
Doing the important configuration and installation
The first step is to replace the contents of package.json with the following contents:
{
  "name": "enrollment-system-beginner",
  "version": "1.0.0",
  "description": "Project for Beginner Module: Express and SQLite",
  "type": "module",
  "main": "server.mjs",
  "scripts": {
    "server": "nodemon server.mjs",
    "client": "vite",
    "dev": "concurrently \"npm run server\" \"npm run client\""
  },
  "dependencies": {
    "concurrently": "^9.2.1",
    "cors": "^2.8.5",
    "dotenv": "^16.3.1",
    "express": "^4.18.2",
    "sqlite3": "^5.1.7",
    "vite": "^7.3.1"
  },
  "overrides": {
    "sqlite3": {
      "tar": "^7.5.8",
      "needle": "^3.3.1",
      "node-gyp": "^11.0.0"
    }
  },
  "devDependencies": {
    "nodemon": "^3.0.2"
  }
}
This will install all the dependencies needed to be able to develop the kind of project we are developing. This has more lines than any package.json file we have ever used, but that is consistent with the kind of project we are developing. Also, note that this uses overrides on lines 20-26. This is not something that is commonly done. The reason for this section of the package.json file is that the sqlite3 package is an old package that depends on other old Node.js packages. Some of those packages, tar, needle and node-gyp that are used by the sqlite3 package on installation have known security risks. Those security risks are for older versions of those packages. By using overrides, newer versions of those packages are used when installing sqlite3, and this removes those security risks.
Replacing source code for the project
Now that we have installed all the dependencies, we can complete the configuration and setup for the project by replacing the code for all of the files we have created. From this point forward, the code will be the same for both the StackBlitz project and the locally developed Vite project. Let’s start with the configuration files:
Configuration files vite.config.js
Here is the code for vite.config.js:
export default {
  root: 'public',
  server: {
    proxy: {
      '/api': 'http://localhost:3000' // Your Express port
    }
  }
}
Copy and paste that to .vite.config.js for your project. This file is needed to make it easier to run the Express server and the frontend that it helps to serve out at the same time.
Source code inside the public folder
Now, we can replace the source code inside the public folder. Let’s start with the files that are essentially the same as from the last lesson: An application using IndexedDB through Dexie.js. Here is the code for index.html:
<!DOCTYPE html>
<html lang="en">
  <head>
    <meta charset="UTF-8" />
    <script type="module" src="app_main.mjs"></script>
    <title>Students and Courses</title>
  </head>
  <body>
    <div id="students_div">
      <button id="courses_button">Courses View</button>
      <h1>Students table</h1>
      <table border="1">
        <thead>
          <tr>
            <th id="id" aria-sort="none">ID</td>
            <th id="first_name" aria-sort="none">First Name</th>
            <th id="last_name" aria-sort="none">Last Name</th>
            <th id="major" aria-sort="none">Major</th>
          </tr>
        </thead>
        <tbody id="students_tbody"></tbody>
      </table>
    </div>
    <div id="courses_div">
      <button id="students_button">Students View</button>
      <h1>Courses</h1>
      <table border="1">
        <thead>
          <tr>
            <th id="id" aria-sort="none">ID</th>
            <th id="dept" aria-sort="none">Department</th>
            <th id="number" aria-sort="none">Number</th>
            <th id="title" aria-sort="none">Title</th>
            <th id="credits" aria-sort="none">Credits</th>
          </tr>
        </thead>
        <tbody id="courses_tbody"></tbody>
      </table>
    </div>
    <dialog id="student_courses_dlg">
      <label id="student_name_label"></label>
      <table border="1">
        <tbody id="student_courses_tbody"></tbody>
      </table>
      <br />
      <button id="close_student_courses_button">Close</button>
    </dialog>
    <dialog id="course_students_dlg">
      <label id="course_name_label"></label>
      <table border="1">
        <tbody id="course_students_tbody"></tbody>
      </table>
      <br />
      <button id="close_course_students_button">Close</button>
    </dialog>
  </body>
</html>
That file is unchanged from the last lesson. Next, here is the code to put into ui_renderer.mjs:
export default function createInterfaceAPI(dbAPI) {
  // private values
  const self = {
    switchToCourses: switchToCourses,
    switchToStudents: switchToStudents,
    initHeaders: initHeaders
  };
  let students_array = [];
  let courses_array = [];
  const students_tbody = document.getElementById("students_tbody");
  const courses_tbody = document.getElementById("courses_tbody");
  const student_courses_dlg = document.getElementById("student_courses_dlg");
  const student_name_label = document.getElementById("student_name_label");
  let student_name;
  const course_students_dlg = document.getElementById("course_students_dlg");
  const course_name_label = document.getElementById("course_name_label");
  let course_name;
  const close_student_courses_button = document.getElementById("close_student_courses_button");
  close_student_courses_button.addEventListener("click", () => { student_courses_dlg.close(); });
  document.getElementById("close_course_students_button")
    .addEventListener("click", () => { course_students_dlg.close(); });

  // ========== API functions for the user-interface ===== //
  function switchToCourses(courses_div, students_div) {
    courses_div.style.display = "block";
    students_div.style.display = "none";
    updateCoursesTable();
  }

  function switchToStudents(courses_div, students_div) {
    courses_div.style.display = "none";
    students_div.style.display = "block";
    updateStudentsTable();
  }

  function initHeaders(courses_div, students_div) {
    const student_headers = students_div.getElementsByTagName('th');
    const course_headers = courses_div.getElementsByTagName('th');
    for (let header of student_headers) {
      header.addEventListener("click", sortStudents);
    }
    for (let header of course_headers) {
      header.addEventListener("click", sortCourses);
    }
  }
  // =========== end of API functions for the user-interface === //

  // =========== helper functions for user-interface===========
  function makeTableFragment(data_array, click_handler) {
    const fragment = document.createDocumentFragment();
    for (let obj of data_array) {
      const tr = document.createElement('tr');
      tr.setAttribute("id", obj.id);
      tr.addEventListener("click", click_handler);
      for (let key of Object.keys(obj)) {
        const td = document.createElement('td');
        const contents = document.createTextNode(obj[key]);
        td.appendChild(contents);
        tr.appendChild(td);
      }
      fragment.appendChild(tr);
    }
    return fragment;
  }

  async function updateStudentsTable() {
    students_array = await dbAPI.getAllStudents();
    const fragment = makeTableFragment(students_array, showStudentCourses);
    students_tbody.replaceChildren(fragment);
  }

  async function updateCoursesTable() {
    courses_array = await dbAPI.getAllCourses();
    const fragment = makeTableFragment(courses_array, showCourseStudents);
    courses_tbody.replaceChildren(fragment);
  }

  async function showStudentCourses(event) {
    const row = event.currentTarget;
    const id = Number(row.id);
    student_name = row.childNodes[1].textContent +
      " " + row.childNodes[2].textContent;
    const courses = await dbAPI.getStudentCourses(id);
    console.log('courses', courses);
    showStudentCoursesDlg(courses);
  }

  async function showCourseStudents(event) {
    const row = event.currentTarget;
    const id = Number(row.id);
    course_name = row.childNodes[1].textContent +
      " " + row.childNodes[2].textContent;
    const students = await dbAPI.getCourseStudents(id);
    showCourseStudentsDlg(students);
  }

  function makeDlgFragment(data_array, key1, key2) {
    const fragment = document.createDocumentFragment();
    for (let obj of data_array) {
      const tr = document.createElement('tr');
      const td = document.createElement('td');
      const contents = document.createTextNode(obj[key1] + " " + obj[key2]);
      td.appendChild(contents);
      tr.appendChild(td);
      fragment.appendChild(tr);
    }
    return fragment;
  }

  function showStudentCoursesDlg(courses) {
    student_name_label.textContent = student_name;
    const fragment = makeDlgFragment(courses,'dept','number')
    student_courses_tbody.replaceChildren(fragment);
    student_courses_dlg.showModal();
  }

  function showCourseStudentsDlg(students) {
    course_name_label.textContent = course_name;
    const fragment = makeDlgFragment(students,'first_name','last_name');
    course_students_tbody.replaceChildren(fragment);
    course_students_dlg.showModal();
  }

  function sortStudents(event) {
    const property = event.target.id;
    const aria_value = event.target.getAttribute("aria-sort");
    if (property === "id") {
      sortStudentsByNumber(property, aria_value);
    } else {
      sortStudentsByString(property, aria_value);
    }
  }

  function sortCourses(event) {
    const property = event.target.id;
    const aria_value = event.target.getAttribute("aria-sort");
    if (property === "id" || property === "credits") {
      sortCoursesByNumber(property, aria_value);
    } else {
      sortCoursesByString(property, aria_value);
    }
  }

  function sortStudentsByNumber(property, aria_value) {
    if (aria_value === "none" || aria_value === "descending") {
      students_array.sort((a,b) => a[property] - b[property]);
      document.getElementById(property).setAttribute("aria-sort", "ascending");
    } else if (aria_value === "ascending") {
      students_array.sort((a,b) => b[property] - a[property]);
      document.getElementById(property).setAttribute("aria-sort", "descending");
    }
    const fragment = makeTableFragment(students_array, showStudentCourses);
    students_tbody.replaceChildren(fragment);
    resetHeadings(property);
  }

  function sortStudentsByString(property, aria_value) {
    if (aria_value === "none" || aria_value === "descending") {
      students_array.sort((a,b) => a[property].localeCompare(b[property]));
      document.getElementById(property).setAttribute("aria-sort", "ascending");
    } else if (aria_value === "ascending") {
      students_array.sort((a,b) => b[property].localeCompare(a[property]));
      document.getElementById(property).setAttribute("aria-sort", "descending");
    }
    const fragment = makeTableFragment(students_array, showStudentCourses);
    students_tbody.replaceChildren(fragment);
    resetHeadings(property);
  }

  function sortCoursesByNumber(property, aria_value) {
    if (aria_value === "none" || aria_value === "descending") {
      courses_array.sort((a,b) => a[property] - b[property]);
      document.getElementById(property).setAttribute("aria-sort", "ascending");
    } else if (aria_value === "ascending") {
      courses_array.sort((a,b) => b[property] - a[property]);
      document.getElementById(property).setAttribute("aria-sort", "descending");
    }
    const fragment = makeTableFragment(courses_array, showCourseStudents);
    courses_tbody.replaceChildren(fragment);
    resetHeadings(property);
  }

  function sortCoursesByString(property, aria_value) {
    if (aria_value === "none" || aria_value === "descending") {
      courses_array.sort((a,b) => a[property].localeCompare(b[property]));
      document.getElementById(property).setAttribute("aria-sort", "ascending");
    } else if (aria_value === "ascending") {
      courses_array.sort((a,b) => b[property].localeCompare(a[property]));
      document.getElementById(property).setAttribute("aria-sort", "descending");
    }
    const fragment = makeTableFragment(courses_array, showCourseStudents);
    courses_tbody.replaceChildren(fragment);
    resetHeadings(property);
  }

  function resetHeadings(property) {
    const headers = document.getElementsByTagName('th');
    for (let header of headers) {
      if (header.id !== property) {
        header.setAttribute("aria-sort", "none");
      }
    }
  }
  // =========== end of helper functions for user-interface ====

  return self;
} // end of createInterfaceAPI factory function
This is the same source as user_interface.mjs from the last lesson, but we are renaming it here to ui_renderer.mjs, as this is the UI (user-interface) renderer.
Here is the code for app_main.mjs:
import createInterfaceAPI from "./ui_renderer.mjs";
import createDatabaseAPI from "./api_client.mjs";

if (document.readyState === "loading") {
  document.addEventListener('DOMContentLoaded', init);
} else {
  init();
}

function init() {
  console.log('init called');
  const courses_div = document.getElementById("courses_div");
  courses_div.style.display = "none";
  const students_div = document.getElementById("students_div");
  const dbAPI = createDatabaseAPI();
  console.log('dbAPI', dbAPI);
  //dbAPI.initDB();
  const uiAPI = createInterfaceAPI(dbAPI);
  const courses_button = document.getElementById("courses_button");
  courses_button.addEventListener("click", () => {
    uiAPI.switchToCourses(courses_div, students_div);
  });
  const students_button = document.getElementById("students_button");
  students_button.addEventListener("click", () => {
    uiAPI.switchToStudents(courses_div, students_div);
  });
  uiAPI.initHeaders(courses_div, students_div);
  uiAPI.switchToStudents(courses_div, students_div);
}
This is the same as the file index.mjs from the last lesson. The only difference is on line 2 where we are importing from api_client.mjs instead of dexie_database.mjs.
Finally, we get to the api_client.mjs file. This is the file where we will be creating the API functions for interacting with the backend database. We will start off with a minimal set of code:
export default function createDatabaseAPI() {
  //private values
  const self = {
    getAllStudents
  };

  // ============== API functions =========================
  async function getAllStudents() {
    return null;
  }
  // ============== end of API functions ==================

  return self;
}
Getting the server side to work
For our web application, we need a server that will provide the connection between the backend database and the web-browser. This is the big difference between the project for this lesson, versus the previous lesson.
The file we need to work on is server.mjs. Here is the first version of server.mjs. This controls the combination of the Node.js HTTP server and Express. So, this is how we can connect to an external database.
Here is the starting code for server.mjs:
import express from 'express';
import cors from 'cors';
import sqlite3 from 'sqlite3';

// 1. Initialize the Database connection
const db = new sqlite3.Database('./data/mydb.sqlite3');

const app = express();

// 2. Middleware
app.use(cors());          // prevents CORS errors
app.use(express.json());  // used to convert JSON request data
app.use(express.static('public')); // Serves index.html and .mjs files automatically

app.get('/api', (req, resp) => {
  resp.json({ info: 'Sqlite and Express' });
});

// start the server
const PORT = 3000;
app.listen(PORT, () => {
    console.log(`Server ready at http://localhost:${PORT}`);
    console.log(`Serving static files from public directory`);
});
Let’s go over the lines in server.mjs. Line 1 imports the express server. This is the heart of what provides the connection between the frontend (web browser) and the backend (external database). Line 2 imports the cors package. This allows avoid the CORS error that would occur because the front end (web browser) is making requests from addresses like localhost:5173, but the express server is on port 3000. This makes the requests to the express server as coming from a different origin. That is what will generate a Common Origin Resource Sharing (CORS) error. The cors package allows us to bypass that error. You can further define the argument to cors() on line 12, by specifying the domains that are allowed to make requests. This is what is typically done in production.
Line 3 imports the sqlite3 package. This is the package that provides the database driver for a SQLite database.
Line 6 uses sqlite3.Database() to connect to the backend database. Line 8 creates the Express object that controls the application’s connection to the external database.
Lines 11-13 are calls to middleware to help Express get its job done. As referred to above, line 11 allows the Express app to avoid CORS errors. Line 12 will convert the JSON requests that are passed from the Node.js HTTP server. This will translate data in the URL (for the route) to be made available in req.params, and will translate data in the body of the request to be made available in req.body.
Line 13, allows Express to return any static files that are located in the public folder. This would include the index.html file, which is used for the frontend. When Express does this, it forwards any appropriate headers so that the static file can be sent back to the web browser by the Node.js HTTP server.
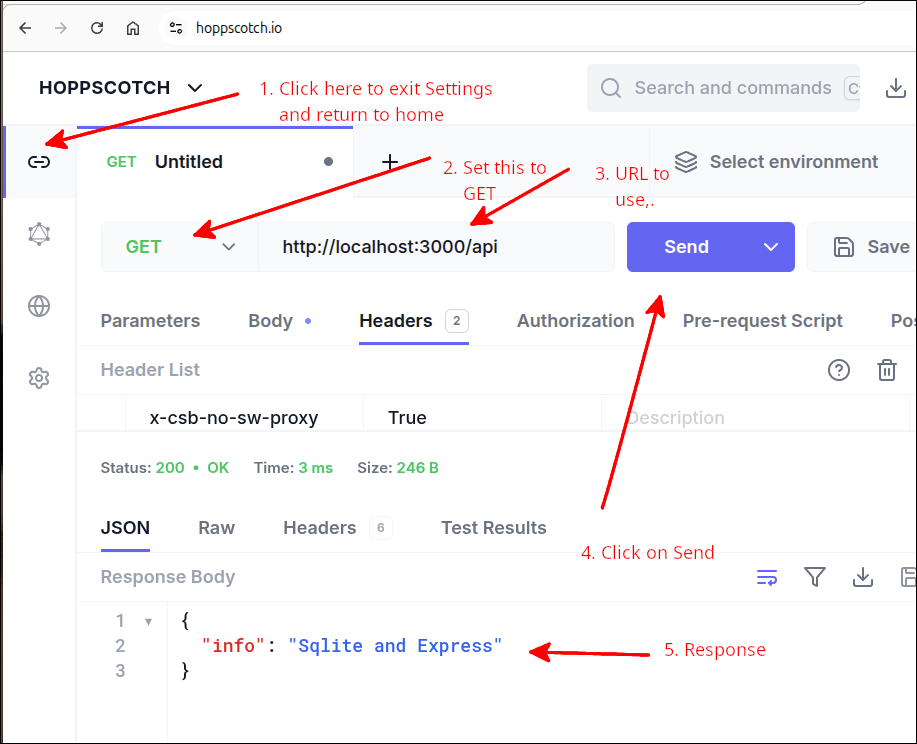
Lines 15-17 define a default route that is used to simply return the message {info: 'Sqlite and Express'} to the web browser, via the Node.js HTTP server. This means that if your web browser uses a route that is the base address followed by '/', this message will be displayed in the web browser. If you are developing locally, inside of VS Code, type the following command into a Terminal:
$ npm run dev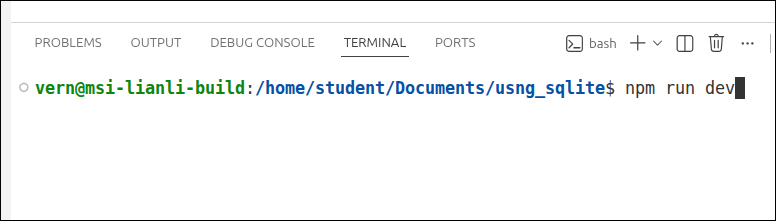
Then you can test the default route out by opening a browser tab to http://localhost:3000/api
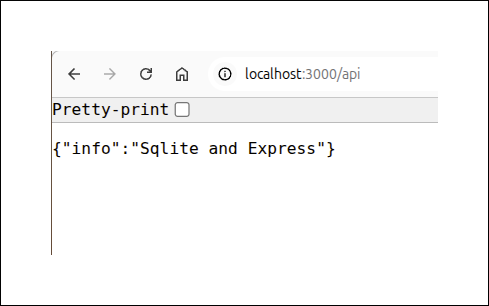
Line 20 defines the listening port for the Express server to be 3000. Lines 21-24 start up that server and lines 22 and 23 will display messages to the console saying the server is listening.
With server.mjs defined, the application should show up in the preview section of StackBlitz. If it does not, you can go back to the Dashboard and start the project up again.
You can open the preview in another tab by clicking on the icon that looks like a square with an arrow pointing to the upper right corner:
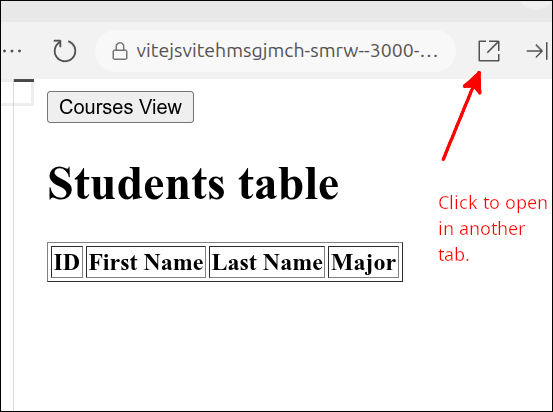
You will have to click on the Connect to Project button in that new tab. You will see the frontend of the application. If you want to see the default route, you can just add '/api' to the end of the URL as shown in the next screen shot:

If you remove '/api' from the end of the URL, you will see the frontend of the application with StackBlitz.
If you are developing locally and you have already run npm run dev from the Terminal inside VS Code, you can open your web browser to localhost:5173 to see the frontend of the application.
Viewing/testing routes
Viewing/testing routes locally
If you are using an external database with your web application, you need to have a good way to test the routes you are setting up with Express. If you are developing locally, a good online tool for this is Hoppscotch (hoppscotch.io). To use this tool you need to install the browser extension for Hoppscotch.
Here is a link to the Hoppscotch browser extension for Chrome: Hoppschotch Browser Extension.
After you have installed that extension, when you go to Hoppscotch, you need to go to Settings and make sure that the interceptor is the browser extension.
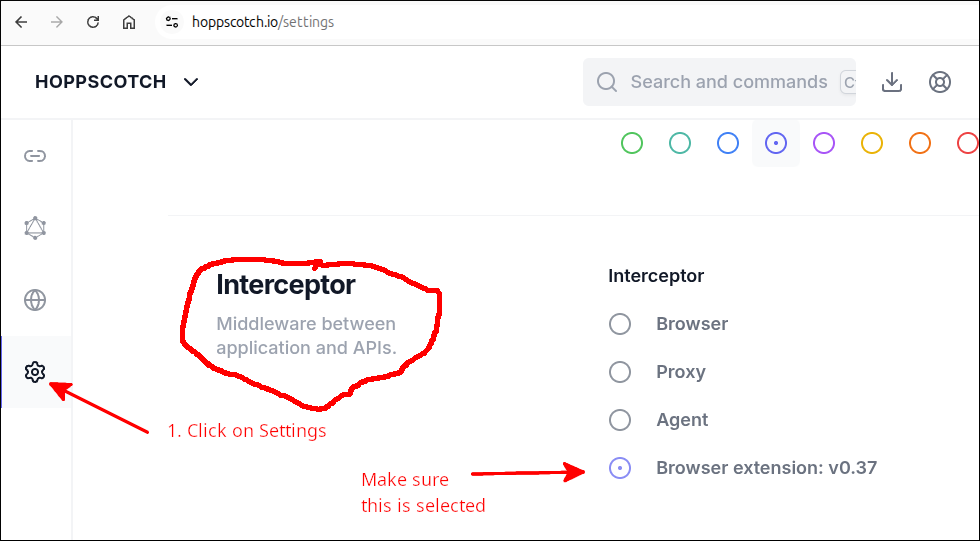
To view the default route, do the following in Hoppscotch:
Viewing/testing routes in StackBlitz
Because of the security features of StackBlitz, you cannot use Hoppscotch to view the routes. Instead, you can just add to the end of the URL the preview opened in that new tab to view the results of that route. You can also use the curl command by running the following inside a new terminal:
> curl http://localhost:3000/api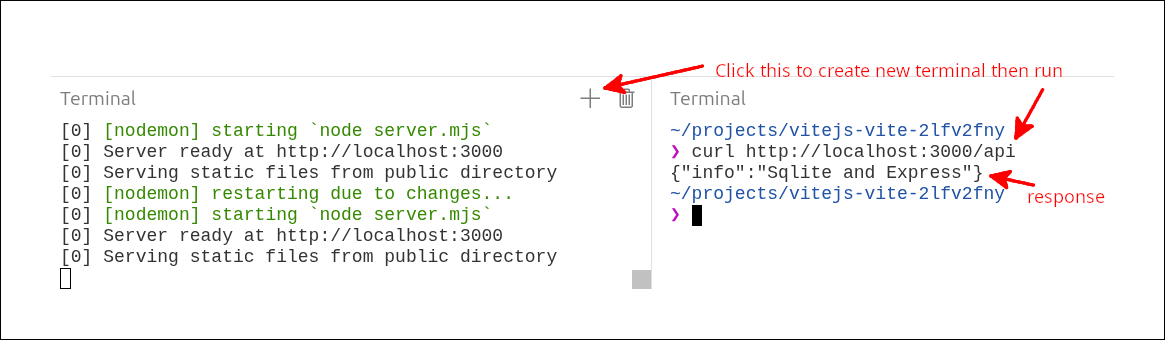
Placing the database file inside the data folder
Before we can start adding routes that actually interact with the database, we need to save the file mydb.sqlite3 inside the data folder. Here is a link to download that file: Click to download mydb.sqlite3
After you have downloaded it to your local computer, open that folder with the file explorer and drag and drop it into the data folder inside your StackBlitz project.
Modifying server.mjs and api_client.mjs
Now that the default route has been tested, we can add another route to server.mjs. Here is the new version of server.mjs:
import express from 'express';
import cors from 'cors';
import sqlite3 from 'sqlite3';
import { promisify } from 'util';

// 1. Initialize the Database connection
const db = new sqlite3.Database('./data/mydb.sqlite3');
const dbAll = promisify(db.all).bind(db);

const app = express();

// 2. Middleware
app.use(cors());          // prevents CORS errors
app.use(express.json());  // used to convert JSON request data
app.use(express.static('public')); // Serves index.html and .mjs files automatically

app.get('/api', (req, resp) => {
  resp.json({ info: 'Sqlite and Express' });
});
app.get('/api/students', async (req, resp) => {
  try {
    const students = await dbAll('select * from students');
    resp.json(students);
  } catch (err) {
    resp.status(500).json({ error: "failed to get students"});
  }
});

// start the server
const PORT = 3000;
app.listen(PORT, () => {
    console.log(`Server ready at http://localhost:${PORT}`);
    console.log(`Serving static files from public directory`);
});
The new lines are 4, 8 and 20-27. Line 4 imports the promisify() function from the util package. The util package is a built in to Node.js. Line 8 uses promisify() to create a function called dbAll() that can be used to perform select queries on tables and views.
Lines 20-27 define a new route that will be used get all the records from the students table in the database. Line 20 starts off by defining the URL for the route as http://localhost:3000/api/students.
Using this proxy is a good idea, because if you change the host, all you need is to change vite.config.js, and the rest of the code will be unchanged.
After that the route handler for this route is defined. On line 20 we declare the route handler to be an async anonymous function. This must be declared as async as we need to use await to wait for the query results to be returned. Note that the parameter req refers to the request, and resp refers to the response that will be sent back to the HTTP server. Since this request is a simple GET that does not send any data, req is not used for this route. Lines 21-24 define a try block that will attempt to query the backend database to return all the records from the students table. Line 22 is how we define that query.
select * from students;This means to select all the records from the students table returning all fields (*).
Upon that Promise resolving, line 23 will convert the returned recordset into JSON format and send it back to the HTTP server as the response. Lines 24-26 deal with any errors that might occur.
We can test this new route in Hoppscotch. The following screen shot shows this:
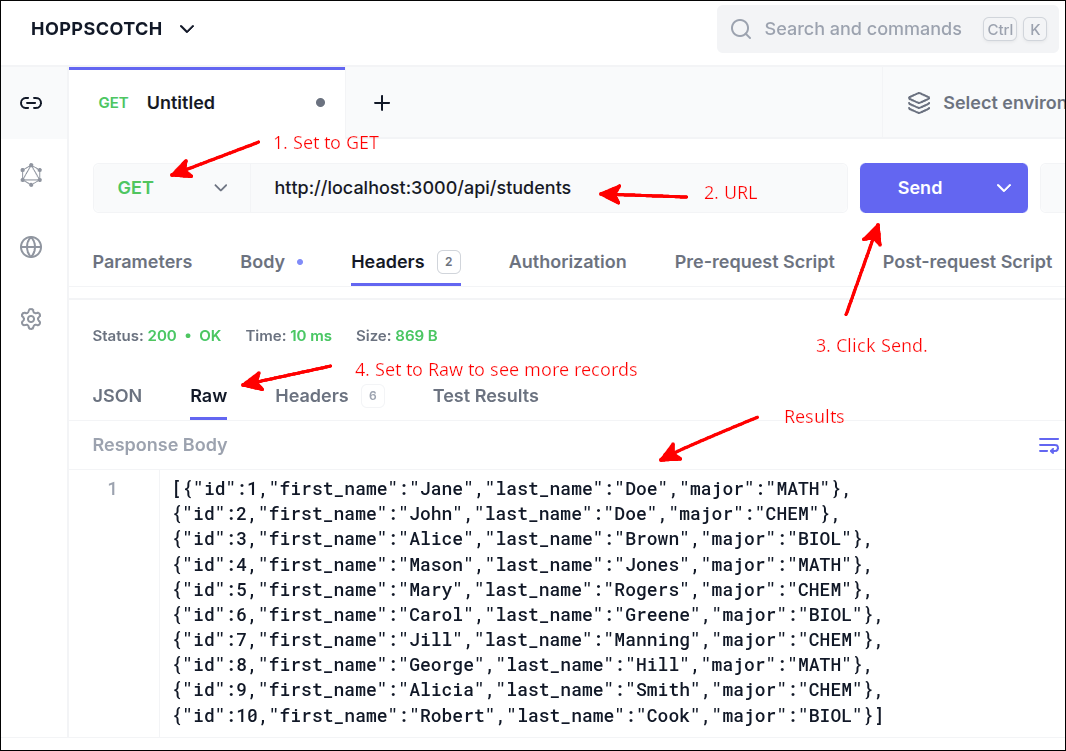
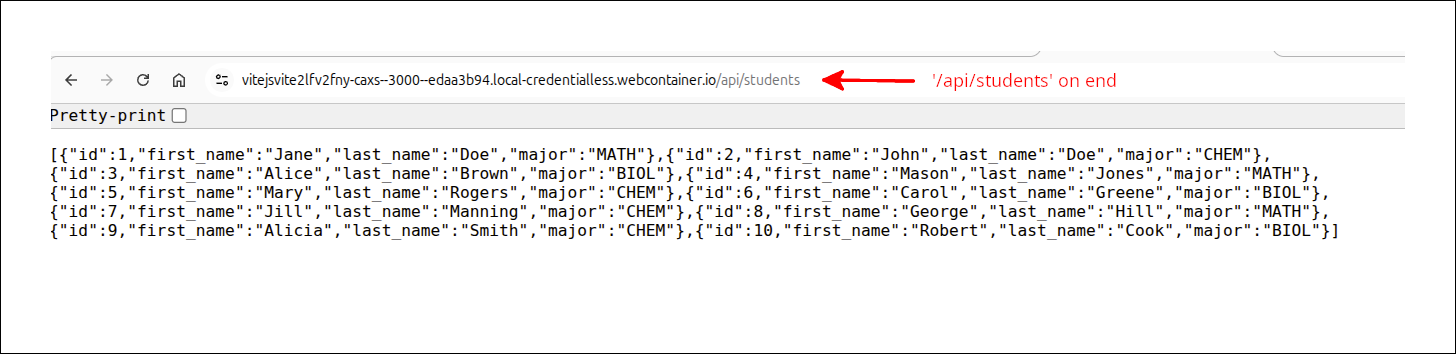
If you are using StackBlitz, adding '/api/students' to the end of the URL should show the same thing.
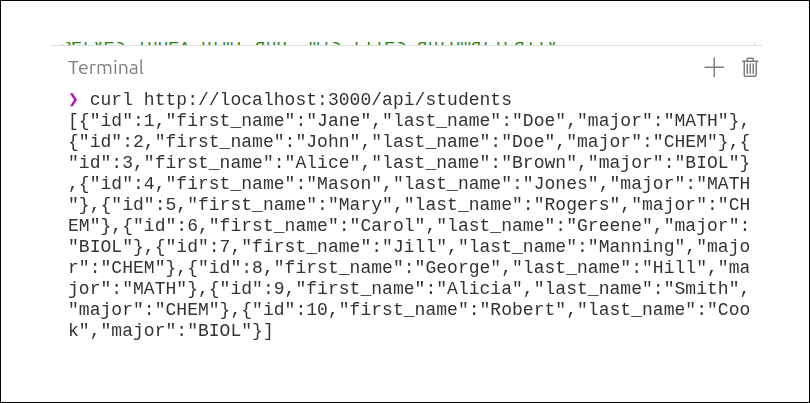
You can also test this using curl inside the terminal in StackBlitz:
Now, that we have tested the route and found that it works, we can modify api_client.mjs to use this route.
Here is the new code for api_client.mjs:
export default function createDatabaseAPI() {
  //private values
  const self = {
    getAllStudents
  };

  // ============== API functions =========================
  async function getAllStudents() {
    try {
      const response = await fetch(`api/students`);
      const data = await (response.json());
      return data;
    } catch (err) {
      console.error("Error fetching students", err);
      return null;
    }
  }
  // ============== end of API functions ==================

  return self;
}
The new lines are 8-17. Lines 8-17 are the new lines inside the getAllStudents() API function. Lines 9-13 define a try block that will attempt to retrieve the students records from the database using the route we just set up inside of server.mjs. We tested this route already. So, if for some reason this attempt fails, it has to be code inside the getAllStudents() function. That is because we know everything is working up until that point.
Line 10 uses the fetch() function to call the route. The nice thing about the fetch() function is that it is already part of basic JavaScript, so it does not require any other packages. Note that fetch() returns a Promise that we must use await to use the resolved value. Line 11 also uses await as formatting response in JSON format does take a finite amount of time. Line 12 returns the JSON formatted response back to the calling program.
Lines 13-16 deal with any errors that could occur while fetching the data. Line 16 returns a null if an error occurs. So, if the calling program receives a null, then it knows that there was an error in fetching the data.
Now, we can see the value of using index.html from the last lesson. In addition, ui_renderer.mjs, app_main.mjs are largely unchanged from the last lesson. So, if we look in the browser at the front end, the HTML table for the students is already filled. Here is a screen shot:
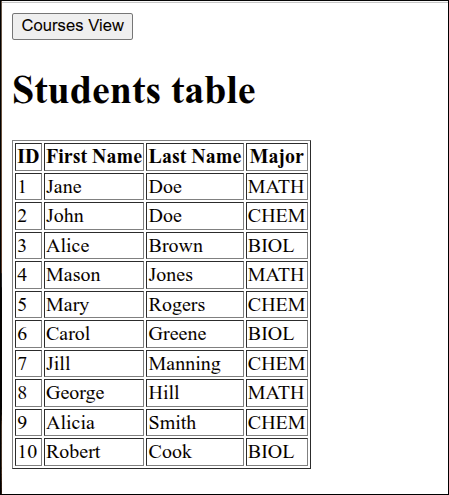
You can already sort this table by clicking on a column heading. That was already put in place from the last lesson.
Getting all the courses
Now that we can get the students, let’s make it so we can get all the courses. We know that the database has the courses, so the next step is to set up a route inside server.mjs so that we can get all the courses records. Here is the next version of server.mjs:
import express from 'express';
import cors from 'cors';
import sqlite3 from 'sqlite3';
import { promisify } from 'util';
// 1. Initialize the Database connection
const db = new sqlite3.Database('./data/mydb.sqlite3');
const dbAll = promisify(db.all).bind(db);
const app = express();
// 2. Middleware
app.use(cors()); // prevents CORS errors
app.use(express.json()); // used to convert JSON request data
app.use(express.static('public')); // Serves index.html and .mjs files automatically
app.get('/api', (req, resp) => {
resp.json({ info: 'Sqlite and Express' });
});
app.get('/api/students', async (req, resp) => {
try {
const students = await dbAll('select * from students');
resp.json(students);
} catch (err) {
resp.status(500).json({ error: "failed to get students"});
}
});
app.get('/api/courses', async (req, resp) => {
try {
const courses = await dbAll('select * from courses');
resp.json(courses);
} catch (err) {
resp.status(500).json({ error: "failed to get courses"});
}
});
// start the server
const PORT = 3000;
app.listen(PORT, () => {
console.log(`Server ready at http://localhost:${PORT}`);
console.log(`Serving static files from public directory`);
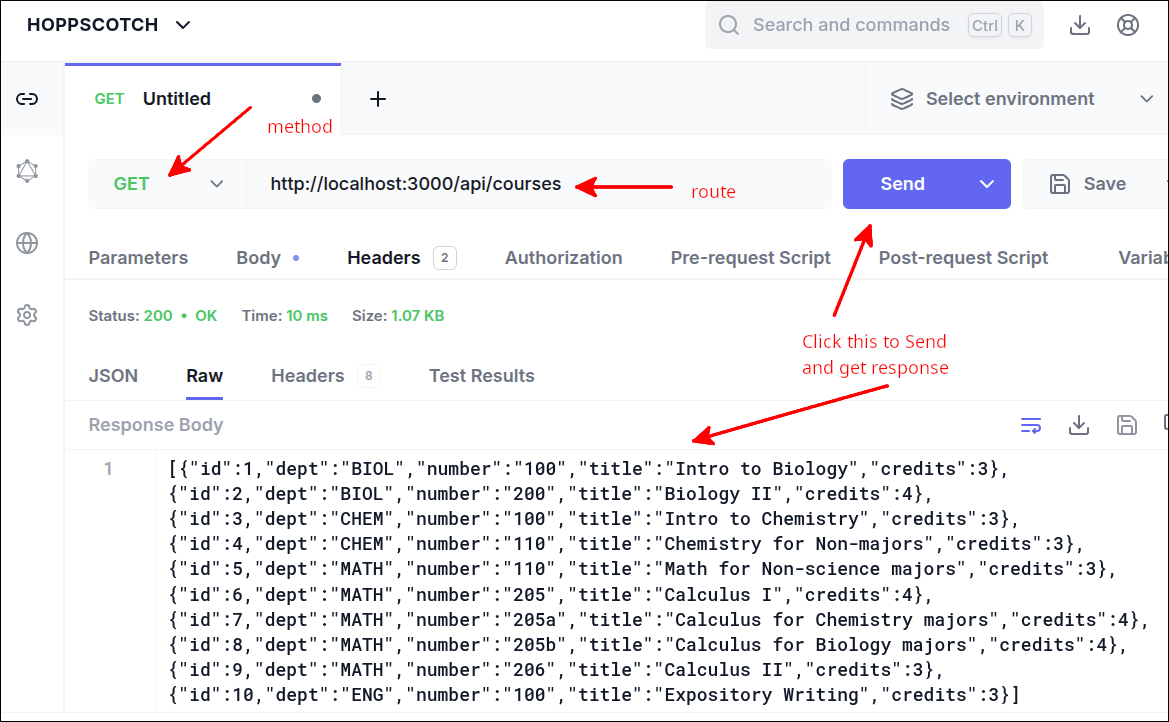
});The new lines are 28-35. Lines 28-35 define the route to get all the courses. Line 28 sets the URL to be used to access this route as http://localhost:3000/api/courses. Lines 28-35 define the route handler for this route. On line 28 we are declaring the route handler to be an anonymous function with the parameters req (for the request) and resp (for the response). Lines 29-32 define a try block that attempts to get all the courses table records. Note on line 30 that we are using the following SQL query:
select * from courses;This should return all the records from the courses table including all fields (*).
This returns a Promise that we await and when that Promise is resolved, line 31 will convert the result into JSON and return that as the response. Lines 32-34 handle any errors that might occur in querying the database.
Testing the route
If you are developing locally, the following screen shot shows testing the route using Hoppscotch:
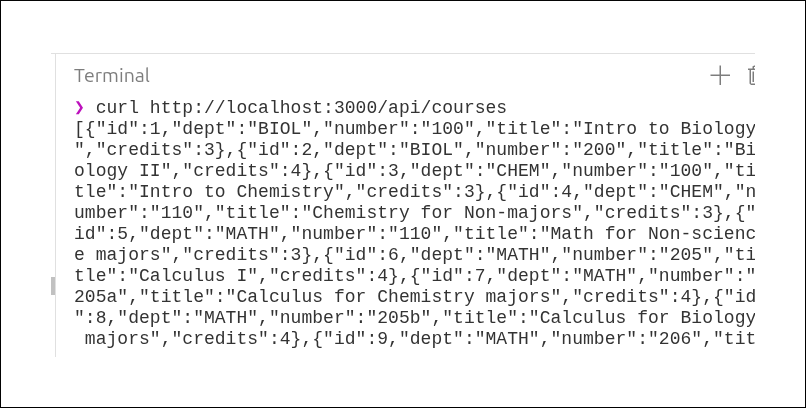
If you are on StackBlitz, you can test this using curl in the terminal:
Modifying api_client.mjs
Now that the new route is tested, we can modify api_client.mjs to make use of this route. Here is the new version of api_client.mjs:
export default function createDatabaseAPI() {
  //private values
  const self = {
    getAllStudents,
    getAllCourses
  };

  // ============== API functions =========================
  async function getAllStudents() {
    try {
      const response = await fetch('/api/students');
      const data = await (response.json());
      return data;
    } catch (err) {
      console.error("Error fetching students", err);
      return null;
    }
  }

  async function getAllCourses() {
    try {
      const response = await fetch('/api/courses');
      const data = await (response.json());
      return data;
    } catch (err) {
      console.error("Error fetching courses", err);
      return null;
    }
  }
  // ============== end of API functions ==================

  return self;
}
The new lines are 4-5 and 20-29. Line 4 adds a comma to the end of the line so that we can add the new API function getAllCourses() on line 5, to the list of returned functions.
Lines 20-29 define the getAllCourses() function. Lines 22-26 define a try block that attempts to fetch the data using the route we just added to server.mjs. If this fetch succeeds, line 24 awaits the conversion of that response to JSON format and line 25 returns that JSON formatted response.
Lines 26-29 handle any errors that might occur when fetching the courses data. Line 28 returns null to the calling program in case any error occurs.
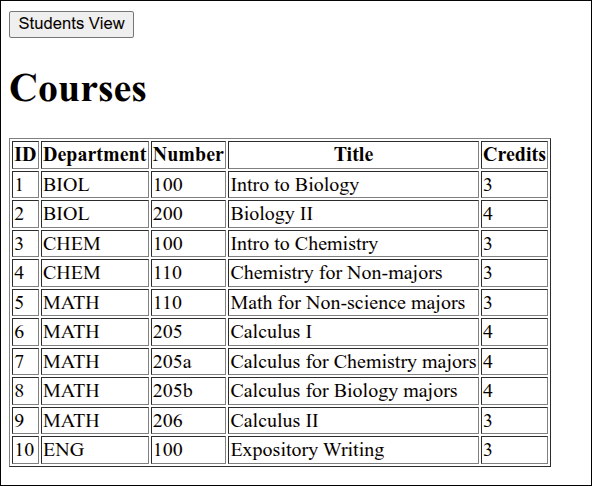
With these changes to server.mjs and api_client.mjs, we can now switch to the Courses view in our application. The following screen shot shows the application after the switch to the Courses View:
Getting the courses a student is enrolled in
Now, let’s get the courses a selected student is enrolled in. We know that the database has the view, student_enrollments_view that can be used to get this information. So, we need to modify the middle to provide a route for this. So, here is the new version of server.mjs:
import express from 'express';
import cors from 'cors';
import sqlite3 from 'sqlite3';
import { promisify } from 'util';
// 1. Initialize the Database connection
const db = new sqlite3.Database('./data/mydb.sqlite3');
const dbAll = promisify(db.all).bind(db);
const app = express();
// 2. Middleware
app.use(cors()); // prevents CORS errors
app.use(express.json()); // used to convert JSON request data
app.use(express.static('public')); // Serves index.html and .mjs files automatically
app.get('/api', (req, resp) => {
resp.json({ info: 'Sqlite and Express' });
});
app.get('/api/students', async (req, resp) => {
try {
const students = await dbAll('select * from students');
resp.json(students);
} catch (err) {
resp.status(500).json({ error: "failed to get students"});
}
});
app.get('/api/courses', async (req, resp) => {
try {
const courses = await dbAll('select * from courses');
resp.json(courses);
} catch (err) {
resp.status(500).json({ error: "failed to get courses"});
}
});
app.get('/api/students/:sid', async (req, resp) => {
const { sid } = req.params;
try {
const courses = await dbAll(
'select * from student_enrollments_view where sid=?', [sid]
);
resp.json(courses);
} catch (err) {
resp.status(500).json({ error: "Failed to get courses for student"});
}
});
// start the server
const PORT = 3000;
app.listen(PORT, () => {
console.log(`Server ready at http://localhost:${PORT}`);
console.log(`Serving static files from public directory`);
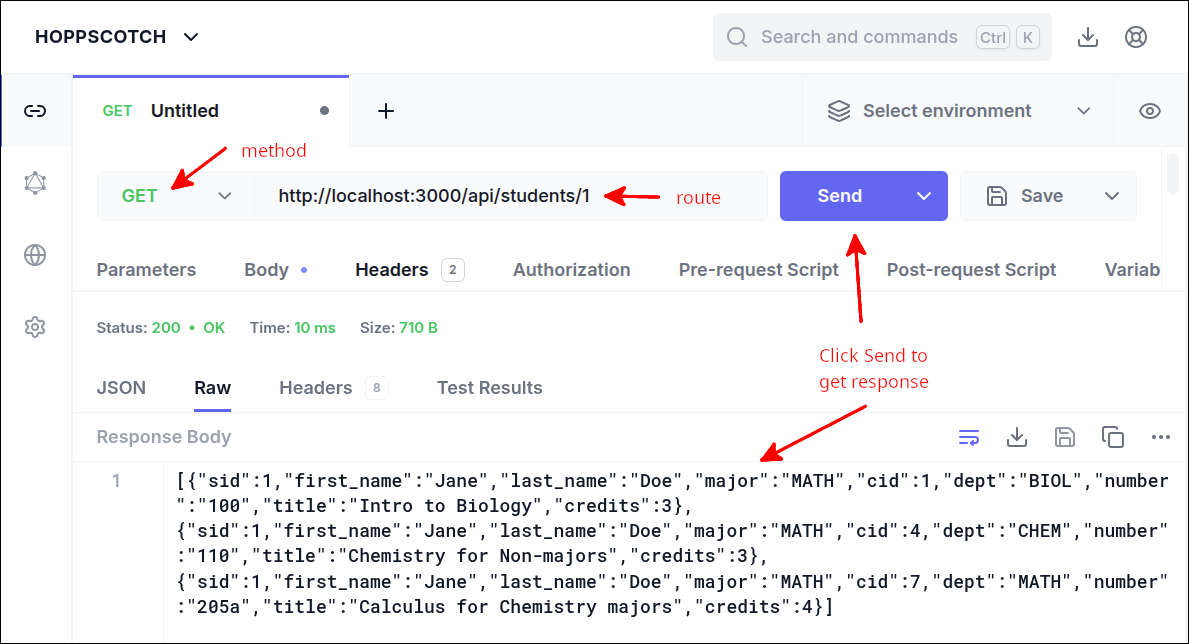
});The new lines are 36-46. These lines define a new route and route handler. Line 36 sets the route to be http://localhost:3000/api/students/:sid. The :sid is a way of designating an id parameter. In this case, we want the pass the student’s id. If you recall in the definition of the student_enrollments_view the student’s id is referred to with the alias sid. The sid is used to specify the student that we will get the enrolled courses for.
Lines 36-46 define the route handler to be an async anonymous function with the parameters (req, resp). The parameter req is used to refer to the request, and the parameter resp is used to refer to the response that will be returned to the calling program. Line 37 gets the value of the sid from req.params. Recall that this is where Express places the values that are passed as part of the URL (the route). Lines 38-43 define a try block that will attempt to perform a select query on the backend database. This uses the SQL command:
select * from student_enrollments_view where sid=?, [sid];The value for sid inside the array is the value passed in req.params. This is called a parameterized query. This is also referred to as data binding. This will substitute the value(s) in the array into the SQL command. That substitution will filter out any harmful values that could have come from the query. This prevents an attack known as SQL Injection.
Line 42 puts the JSON formatted form of the values returned by this query into the response that is sent back to the calling program.
Lines 43-45 deal with any errors that might occur by setting the response status to 500 (signalling a server error) and sending a JSON formatted error message.
Testing the route
If you are developing locally, you can use Hoppscotch to test this route. The following screen shot shows that this new route is working:
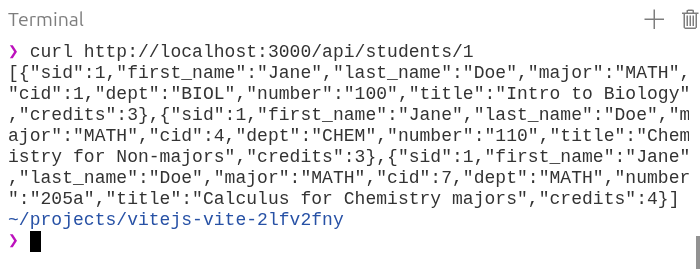
If you are on StackBlitz, you can use curl inside the Terminal to test this route. The following screen shot shows that the new route is working:
Modifying api_client.mjs
Now that we have tested the new route, we can modify api_client.mjs to make use of this new route. Here is the new version of api_client.mjs:
export default function createDatabaseAPI() {
  //private values
  const self = {
    getAllStudents,
    getAllCourses,
    getStudentCourses
  };

  // ============== API functions =========================
  async function getAllStudents() {
    try {
      const response = await fetch('/api/students');
      const data = await (response.json());
      return data;
    } catch (err) {
      console.error("Error fetching students", err);
      return null;
    }
  }

  async function getAllCourses() {
    try {
      const response = await fetch('/api/courses');
      const data = await (response.json());
      return data;
    } catch (err) {
      console.error("Error fetching courses", err);
      return null;
    }
  }

  async function getStudentCourses(id) {
    try {
      const response = await fetch(`/api/students/${id}`);
      const data = await (response.json());
      return data;
    } catch (err) {
      console.error("Error fetching courses for student", err);
      return null;
    }
  }
  // ============== end of API functions ==================

  return self;
}
The new lines are 5-6 and 32-41. Line 5 adds a comma to the end of the line because we are adding a new API function, getStudentCourses() on line 6.
Lines 32-41 define the getStudentCourses() API function. Note that we need to make this name match what the ui_renderer.mjs module expects. Lines 34-38 define a try block that attempts to fetch the student’s course enrollments by making use of the route, http://localhost:3000/api/students/5, if we wanted the courses for the student with an id = 5. On line 34, note that we are using backticks so that we can use variable substitution to complete that string.
So, the expression:
`/api/students/${id}`gets converted into (with the help of the proxy):
"http://localhost:3000/api/students/5"if id is 5.
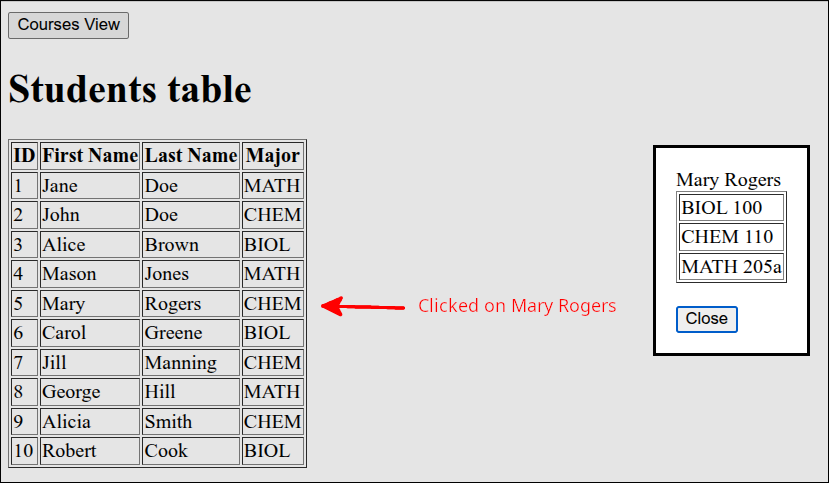
If that fetch succeeds, line 35 awaits the conversion of that response to JSON format. Line 36 returns that JSON-formatted response to the calling program.
Lines 37-40 handle any errors that might occur when trying to fetch the courses for the specified student. With these changes made, here is a screen shot showing what happens when the user clicks on a student (Mary Rogers) in the students HTML table:
Getting the students enrolled in a course
Next, we can work on the last API function to get our application fully functioning. This is the be able to get the students enrolled in a specific course. We know the database already has the data for this. In addition, the database has the course_enrollments_view to make it straightforward to get this data. So, we need to work on the middleware, or server.mjs:
import express from 'express';
import cors from 'cors';
import sqlite3 from 'sqlite3';
import { promisify } from 'util';
// 1. Initialize the Database connection
const db = new sqlite3.Database('./data/mydb.sqlite3');
const dbAll = promisify(db.all).bind(db);
const app = express();
// 2. Middleware
app.use(cors()); // prevents CORS errors
app.use(express.json()); // used to convert JSON request data
app.use(express.static('public')); // Serves index.html and .mjs files automatically
app.get('/api', (req, resp) => {
resp.json({ info: 'Sqlite and Express' });
});
app.get('/api/students', async (req, resp) => {
try {
const students = await dbAll('select * from students');
resp.json(students);
} catch (err) {
resp.status(500).json({ error: "failed to get students"});
}
});
app.get('/api/courses', async (req, resp) => {
try {
const courses = await dbAll('select * from courses');
resp.json(courses);
} catch (err) {
resp.status(500).json({ error: "failed to get courses"});
}
});
app.get('/api/students/:sid', async (req, resp) => {
const { sid } = req.params;
try {
const courses = await dbAll(
'select * from student_enrollments_view where sid=?', [sid]
);
resp.json(courses);
} catch (err) {
resp.status(500).json({ error: "Failed to get courses for student"});
}
});
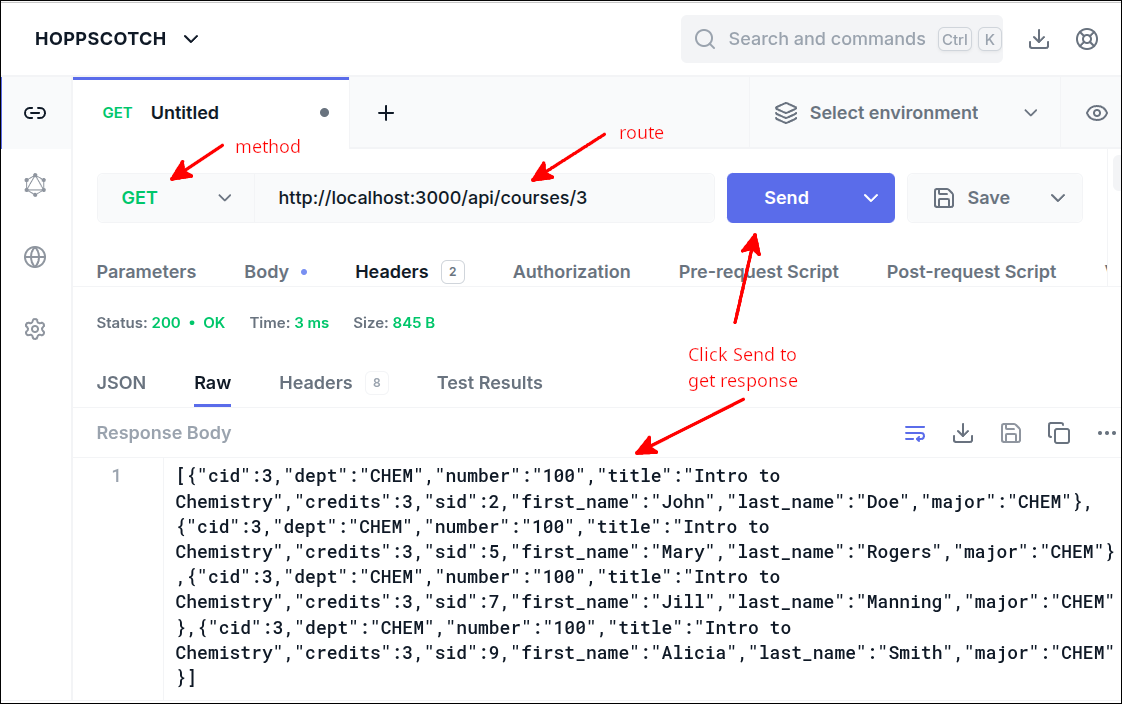
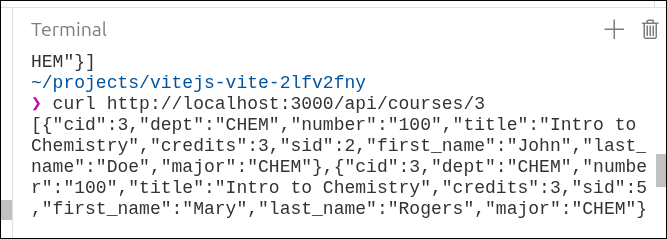
app.get('/api/courses/:cid', async (req, resp) => {
const { cid } = req.params;
try {
const students = await dbAll(
'select * from course_enrollments_view where cid=?', [cid]
);
resp.json(students);
} catch (err) {
resp.status(500).json({ error: "Failed to get students for course"});
}
});
// start the server
const PORT = 3000;
app.listen(PORT, () => {
console.log(`Server ready at http://localhost:${PORT}`);
console.log(`Serving static files from public directory`);
});The new lines are 47-57. These lines define the route and route handler for getting the students enrolled in a specific course. On line 47, the route specifies that the URL to use for this route is http://localhost:3000/api/courses/:cid. Lines 47-57 define the route handler as being an async anonymous function with the parameters (req, resp). As in the other route handlers, req refers to the request, and resp refers to the response sent back to the calling application.
Line 48 obtains the value for cid from req.params. Lines 49-54 define a try block that attempts to retrieve the records from the courses_enrollments_view that match the specified cid. Line 51 does this:
'select * from course_enrollments_view where cid=?', [cid];This uses a parameterized query that prevents SQL Injection as mentioned above for the query of the student_enrollments_view.
Line 53 sends the JSON-formatted query results back as the response.
Lines 54-56 deal with any errors that might occur when trying to complete that query. Note that this will set the response status to 500 (Network server error) and send along a JSON object showing the error message.
Testing the route
With this route added, we can test the local developed project using Hoppscotch. The screen shot shown next shows that the route works:
The next screen shot shows testing the route in StackBlitz, using curl in a terminal:
Modifying api_client.mjs
With the new route tested, we can modify api_client.mjs to add the last API function:
export default function createDatabaseAPI() {
  //private values
  const self = {
    getAllStudents,
    getAllCourses,
    getStudentCourses,
    getCourseStudents
  };

  // ============== API functions =========================
  async function getAllStudents() {
    try {
      const response = await fetch('/api/students');
      const data = await (response.json());
      return data;
    } catch (err) {
      console.error("Error fetching students", err);
      return null;
    }
  }

  async function getAllCourses() {
    try {
      const response = await fetch('/api/courses');
      const data = await (response.json());
      return data;
    } catch (err) {
      console.error("Error fetching courses", err);
      return null;
    }
  }

  async function getStudentCourses(id) {
    try {
      const response = await fetch(`/api/students/${id}`);
      const data = await (response.json());
      return data;
    } catch (err) {
      console.error("Error fetching courses for student", err);
      return null;
    }
  }

  async function getCourseStudents(id) {
    try {
      const response = await fetch(`/api/courses/${id}`);
      const data = await (response.json());
      return data;
    } catch (err) {
      console.error("Error fetching students for course", err);
      return null;
    }
  }
  // ============== end of API functions ==================

  return self;
}
The new lines are 6-7 and 44-53. Line 6 adds a comma to the end of the line as line 7 adds the new API function getCourseStudents(). Lines 44-53 defines the getCourseStudents() API function. Lines 45-49 define a try block that attempts to fetch the students enrolled in a specified course by using the route:
assuming that the course’s id = 3. Line 47 will await the conversion of the response into JSON format. Line 48 returns that JSON-formatted response to the calling program. Lines 49-52 deal with any errors that occur while trying to fetch that data.
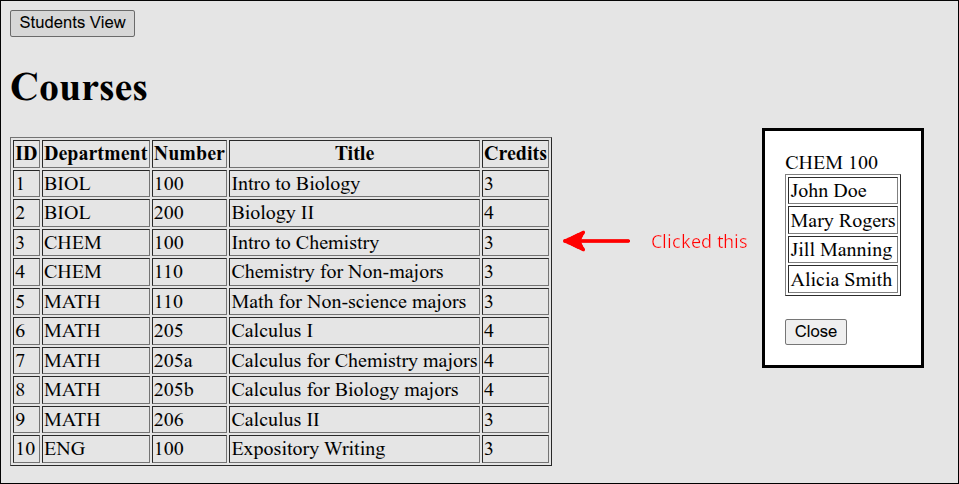
The following screen shot shows the results of clicking on the CHEM 100, the course with an id=3:
Now that we have completed all the API functions, our application is complete. The following animated gif shows the application in action:
Click on Reload gif to replay animation.
This completes the lesson.
Summary
-
This was the first project where we made use of an external database. This introduced quite a bit of complexity. It is very important in developing web applications that use an external database, to develop the parts in the correct order. backend (database) → middleware (application server) → frontend (front-facing webpage).
-
We made use of SQLite for our external database. This is a relational database. This is a commonly used type of database because it removes the need for duplicate data and makes it easier to maintain the database integrity. Database integrity allows for proper querying of the data.
-
We looked at some basic SQL (Structured Query Language) instructions and created tables and views. Views are very important for querying a relational database in situations where multiple tables are being queried at once.
-
The setup for this project was quite involved. This is because of the complexity of developing a web application that uses an external database. So, we made use of several folders and a complex package.json file to help make developing the project easier.
-
In the package.json file we made use of overrides to remove security violations associated with the build packages for sqlite3. Sometimes, when installing Node.js packages, you can fix security violations for older packages by using overrides.
-
We reused a lot of the code from the previous lesson: Building an Application using Dexie.js. So, the main things we needed to develop here, was the application server (server.mjs) and the API functions (in api_client.mjs) that made use of the application server routes.
-
We made use of Node.js'
util.promisify()function. This converted a function that uses the old style of callbacks, to one that returns a Promise. This simplifies the coding, and should be considered if using Node.js. -
Using routes provided a way to connect the frontend with the backend database. A route allows making a HTTP request from the web browser, that the application server can process to return a HTTP response back to the web browser.
-
Testing routes is an important process in developing the middleware. We used Hoppscotch for the locally developed project, and curl inside a terminal for the StackBlitz version of the project to test our routes.
-
Since we reused much of the code for the frontend from the previous lesson, once the routes were created and tested, all that remained was to write the API functions that made use of those routes. This is a good example of reusing modules in creating a project.
-
Although not a complete web application, the web application we built for this lesson has practical value as it emphasizes:
-
Reusing code whenever possible.
-
Using an external database. External databases are used in some form or fashion in a great majority of web applications used to help run a business.
-