An application using PostgreSQL provided by Neon
Building an application using an external database provided by Neon
Like the last lesson, this lesson will use an external database. This external database will be using the PostgreSQL Database Management System (DBMS), and that will be provided by Neon Cloud (Neon.com)
Getting a Neon Cloud account
Go to Neon.com, and click on the Start for Free button. You can create your free account using Google, GitHub or Microsoft account or you can create your own, using your email and a unique password.
The free tier supports up to 100 projects, 100 CU-hours per project, 0.5 GB per project, and sizes up to 2 CU (8 GB RAM). It uses PostgreSQL and should provide ample support for a learning project. The free tier even supports the pgcrypto extension, which can be useful for authentication purposes. Although authentication is beyond the scope of this lesson, that is a very important feature if you are building a more complete application.
Creating project on Neon
Choose project name: PostgreSQL test1 (I chose this for my project name)
Cloud service provider: AWS
Region: AWS US West 2 (Oregon)
Setting up a connection to your Neon project
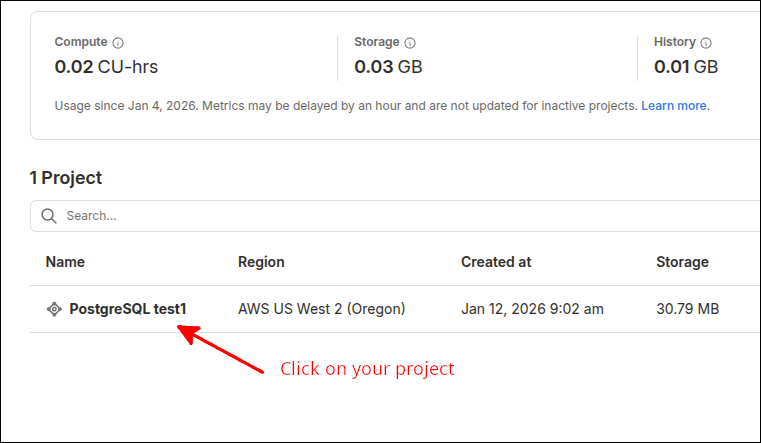
If you are logged into your Neon account, in the ORGANIZATION left sidebar, you can click on Projects to see your projects. Click on your project (I named my project PostgreSQL test1).
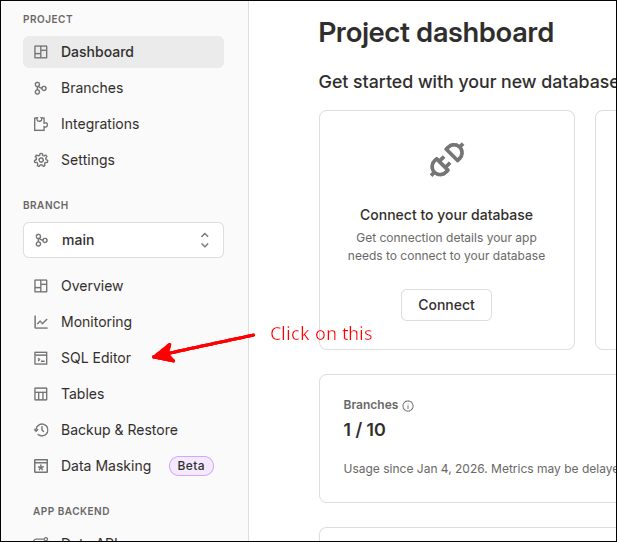
This opens up your Project dashboard. On the dashboard, clicking on the Connect button in the Connect to your database area will bring up the connection information.
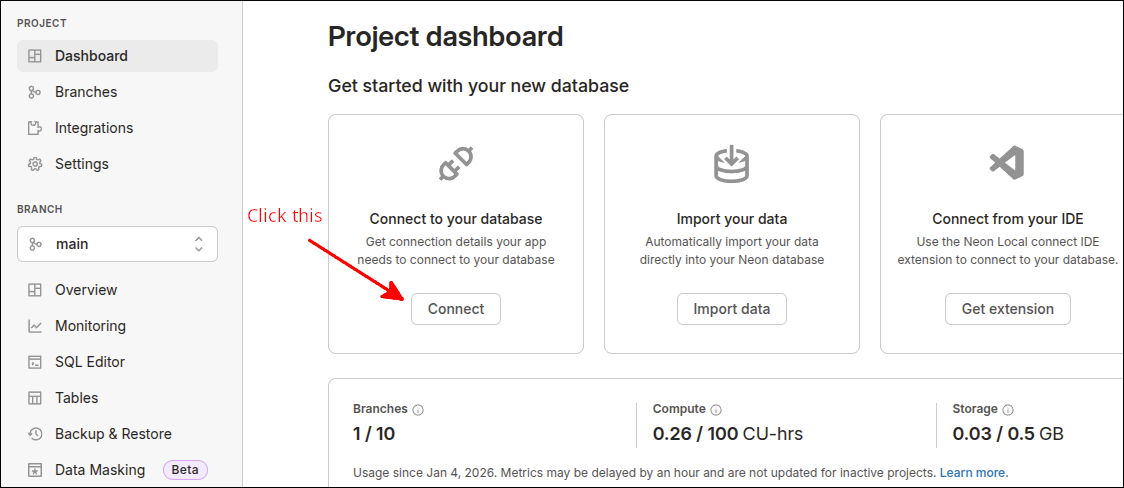
That connection information will look like this:
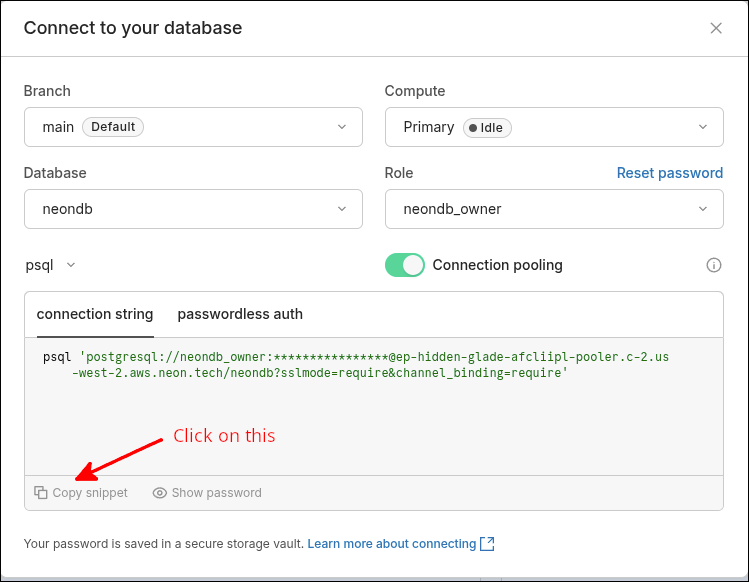
You would click on the Copy snippet button to make a copy of the connection string. For now, create a file called .env. Note that this filename begins with a dot (.). Start the .env file with DATABASE_URL=, then paste in that snipper you copied. Remove the word psql and remove the quotes around the string starting with postgresql://. The file should look like this:
DATABASE_URL=postgresql://neondb_owner:***************@ep-hidden-glade-afcliipl-pooler.c-2.us-west-2.aws.neon.tech/neondb?sslmode=require&channel_binding=requireSo, you set DATABASE_URL to the string following psql. Remove psql and the quotes around the string.. Your actual owner name will show up instead of the asterisks.
You can save this file to your Desktop for now, as you will use it later.
Getting Started
Just as with the last lesson, there is a lot of setup to starting this project. The setup is very similar to that lesson: Using Sqlite3 as an external database
Setting up the project in StackBlitz
We will start off using one of StackBlitz’s popular templates, the JS Vanilla template. This was done in an earlier lesson and can be reviewed here: Starting the lesson in StackBlitz. Here is a summary of the steps:
-
Login to your StackBlitz account.
-
Click on the New project button, and click on the Popular templates.
-
Look for the JS Vanilla template and click on it.
-
Edit the project info and change the Title to using_neon.
-
In the PROJECT area, right-click and delete the src folder. Move index.html into the public folder. Or, delete index.html and recreate index.html inside the public folder.
-
Inside the public folder create the following files:: index.html (if you have not already created it), app_main.mjs, ui_renderer.mjs and api_client.mjs. Delete the .svg files.
-
Inside the main folder create the files server.mjs, vite.config.js and .nvmrc. The main folder should already have the file package.json (although we will replace its contents).
-
Drag your .env file into the main folder.
Your PROJECT area should look like this:
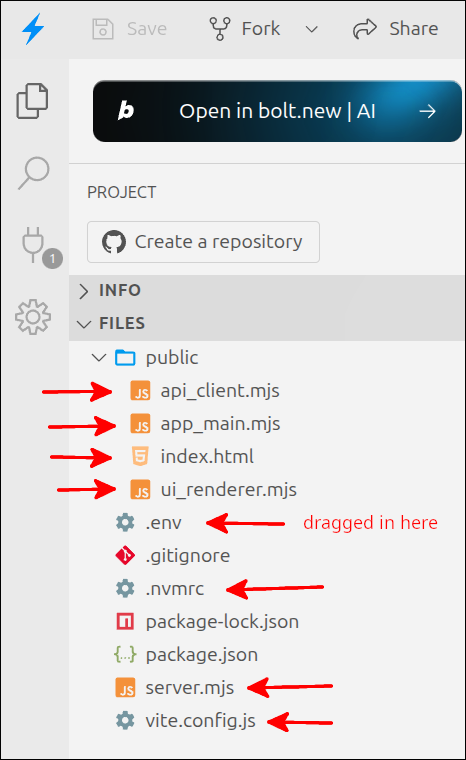
The arrows pointing from the left are for files inside the public folder. The arrows pointing from the right are for files inside the main (root) folder. The package.json file was already there, but we will change the contents shortly.
Setting up the project locally using Vite
You can go to your ~/Documents folder and make a directory called using_neon. Then, you could make the same folders and files using VS Code. You can also start this by doing this at the command line. To do this, go to a terminal and run the following commands:
$ cd ~/Documents
$ mkdir using_neon
$ cd using_neon
$ mkdir public
$ cd public
$ touch index.html app_main.mjs ui_renderer.mjs api_client.mjs
$ cd ~/Documents/using_neon
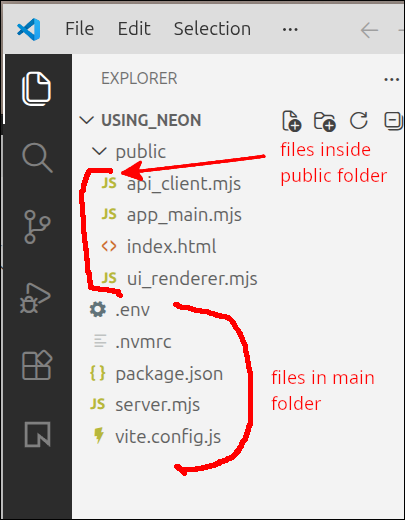
$ touch package.json server.mjs vite.config.js .nvmrcOpen up the ~/Documents/using_neon folder in VS Code. Drag your .env file into the main (root) folder. Your EXPLORER section should look like this:
Doing the important configuration and installation
The first step is to replace the contents of package.json with the following contents:
{
  "name": "enrollment-system-beginner",
  "version": "1.0.0",
  "description": "Final project for Beginner Module: Express, PostgreSQL",
  "type": "module",
  "main": "server.mjs",
  "scripts": {
    "server": "nodemon server.mjs",
    "client": "vite",
    "dev": "concurrently \"npm run server\" \"npm run client\""
  },
  "engines": {
    "node": "20.18.0"
  },
  "dependencies": {
    "@neondatabase/serverless": "^1.0.2",
    "concurrently": "^9.2.1",
    "cors": "^2.8.5",
    "dotenv": "^16.3.1",
    "express": "^5.2.1",
    "pg": "^8.20.0"
  },
  "devDependencies": {
    "nodemon": "^3.1.14",
    "vite": "^6.0.0"
  }
}
This will install all the dependencies needed to be able to develop the kind of project we are developing. Like the last lesson, this has more lines than any package.json file we have used prior to the last lesson, but that is consistent with the kind of project we are developing.
To make it so that the Node.js version is 20.18.0 as specified on lines 12-14, we need the .nvmrc file. Here is the contents for that file. Note that this file, like .env, begins with a dot.
20.18.0

Starting source code in public folder
For the files in the public folder, we will be using the same code as from the last lesson Using Sqlite3 as an external database.
Here is the code for index.html:
<!DOCTYPE html>
<html lang="en">
  <head>
    <meta charset="UTF-8" />
    <script type="module" src="app_main.mjs"></script>
    <title>Students and Courses</title>
  </head>
  <body>
    <div id="students_div">
      <button id="courses_button">Courses View</button>
      <h1>Students table</h1>
      <table border="1">
        <thead>
          <tr>
            <th id="id" aria-sort="none">ID</td>
            <th id="first_name" aria-sort="none">First Name</th>
            <th id="last_name" aria-sort="none">Last Name</th>
            <th id="major" aria-sort="none">Major</th>
          </tr>
        </thead>
        <tbody id="students_tbody"></tbody>
      </table>
    </div>
    <div id="courses_div">
      <button id="students_button">Students View</button>
      <h1>Courses</h1>
      <table border="1">
        <thead>
          <tr>
            <th id="id" aria-sort="none">ID</th>
            <th id="dept" aria-sort="none">Department</th>
            <th id="number" aria-sort="none">Number</th>
            <th id="title" aria-sort="none">Title</th>
            <th id="credits" aria-sort="none">Credits</th>
          </tr>
        </thead>
        <tbody id="courses_tbody"></tbody>
      </table>
    </div>
    <dialog id="student_courses_dlg">
      <label id="student_name_label"></label>
      <table border="1">
        <tbody id="student_courses_tbody"></tbody>
      </table>
      <br />
      <button id="close_student_courses_button">Close</button>
    </dialog>
    <dialog id="course_students_dlg">
      <label id="course_name_label"></label>
      <table border="1">
        <tbody id="course_students_tbody"></tbody>
      </table>
      <br />
      <button id="close_course_students_button">Close</button>
    </dialog>
  </body>
</html>
That code is unchanged from the last lesson.
Here is the code for ui_renderer.mjs:
export default function createInterfaceAPI(dbAPI) {
  // private values
  const self = {
    switchToCourses: switchToCourses,
    switchToStudents: switchToStudents,
    initHeaders: initHeaders
  };
  let students_array = [];
  let courses_array = [];
  const students_tbody = document.getElementById("students_tbody");
  const courses_tbody = document.getElementById("courses_tbody");
  const student_courses_dlg = document.getElementById("student_courses_dlg");
  const student_name_label = document.getElementById("student_name_label");
  let student_name;
  const course_students_dlg = document.getElementById("course_students_dlg");
  const course_name_label = document.getElementById("course_name_label");
  let course_name;
  const close_student_courses_button = document.getElementById("close_student_courses_button");
  close_student_courses_button.addEventListener("click", () => { student_courses_dlg.close(); });
  document.getElementById("close_course_students_button")
    .addEventListener("click", () => { course_students_dlg.close(); });

  // ========== API functions for the user-interface ===== //
  function switchToCourses(courses_div, students_div) {
    courses_div.style.display = "block";
    students_div.style.display = "none";
    updateCoursesTable();
  }

  function switchToStudents(courses_div, students_div) {
    courses_div.style.display = "none";
    students_div.style.display = "block";
    updateStudentsTable();
  }

  function initHeaders(courses_div, students_div) {
    const student_headers = students_div.getElementsByTagName('th');
    const course_headers = courses_div.getElementsByTagName('th');
    for (let header of student_headers) {
      header.addEventListener("click", sortStudents);
    }
    for (let header of course_headers) {
      header.addEventListener("click", sortCourses);
    }
  }
  // =========== end of API functions for the user-interface === //

  // =========== helper functions for user-interface===========
  function makeTableFragment(data_array, click_handler) {
    const fragment = document.createDocumentFragment();
    for (let obj of data_array) {
      const tr = document.createElement('tr');
      tr.setAttribute("id", obj.id);
      tr.addEventListener("click", click_handler);
      for (let key of Object.keys(obj)) {
        const td = document.createElement('td');
        const contents = document.createTextNode(obj[key]);
        td.appendChild(contents);
        tr.appendChild(td);
      }
      fragment.appendChild(tr);
    }
    return fragment;
  }

  async function updateStudentsTable() {
    students_array = await dbAPI.getAllStudents();
    const fragment = makeTableFragment(students_array, showStudentCourses);
    students_tbody.replaceChildren(fragment);
  }

  async function updateCoursesTable() {
    courses_array = await dbAPI.getAllCourses();
    const fragment = makeTableFragment(courses_array, showCourseStudents);
    courses_tbody.replaceChildren(fragment);
  }

  async function showStudentCourses(event) {
    const row = event.currentTarget;
    const id = Number(row.id);
    student_name = row.childNodes[1].textContent +
      " " + row.childNodes[2].textContent;
    const courses = await dbAPI.getStudentCourses(id);
    console.log('courses', courses);
    showStudentCoursesDlg(courses);
  }

  async function showCourseStudents(event) {
    const row = event.currentTarget;
    const id = Number(row.id);
    course_name = row.childNodes[1].textContent +
      " " + row.childNodes[2].textContent;
    const students = await dbAPI.getCourseStudents(id);
    showCourseStudentsDlg(students);
  }

  function makeDlgFragment(data_array, key1, key2) {
    const fragment = document.createDocumentFragment();
    for (let obj of data_array) {
      const tr = document.createElement('tr');
      const td = document.createElement('td');
      const contents = document.createTextNode(obj[key1] + " " + obj[key2]);
      td.appendChild(contents);
      tr.appendChild(td);
      fragment.appendChild(tr);
    }
    return fragment;
  }

  function showStudentCoursesDlg(courses) {
    student_name_label.textContent = student_name;
    const fragment = makeDlgFragment(courses,'dept','number')
    student_courses_tbody.replaceChildren(fragment);
    student_courses_dlg.showModal();
  }

  function showCourseStudentsDlg(students) {
    course_name_label.textContent = course_name;
    const fragment = makeDlgFragment(students,'first_name','last_name');
    course_students_tbody.replaceChildren(fragment);
    course_students_dlg.showModal();
  }

  function sortStudents(event) {
    const property = event.target.id;
    const aria_value = event.target.getAttribute("aria-sort");
    if (property === "id") {
      sortStudentsByNumber(property, aria_value);
    } else {
      sortStudentsByString(property, aria_value);
    }
  }

  function sortCourses(event) {
    const property = event.target.id;
    const aria_value = event.target.getAttribute("aria-sort");
    if (property === "id" || property === "credits") {
      sortCoursesByNumber(property, aria_value);
    } else {
      sortCoursesByString(property, aria_value);
    }
  }

  function sortStudentsByNumber(property, aria_value) {
    if (aria_value === "none" || aria_value === "descending") {
      students_array.sort((a,b) => a[property] - b[property]);
      document.getElementById(property).setAttribute("aria-sort", "ascending");
    } else if (aria_value === "ascending") {
      students_array.sort((a,b) => b[property] - a[property]);
      document.getElementById(property).setAttribute("aria-sort", "descending");
    }
    const fragment = makeTableFragment(students_array, showStudentCourses);
    students_tbody.replaceChildren(fragment);
    resetHeadings(property);
  }

  function sortStudentsByString(property, aria_value) {
    if (aria_value === "none" || aria_value === "descending") {
      students_array.sort((a,b) => a[property].localeCompare(b[property]));
      document.getElementById(property).setAttribute("aria-sort", "ascending");
    } else if (aria_value === "ascending") {
      students_array.sort((a,b) => b[property].localeCompare(a[property]));
      document.getElementById(property).setAttribute("aria-sort", "descending");
    }
    const fragment = makeTableFragment(students_array, showStudentCourses);
    students_tbody.replaceChildren(fragment);
    resetHeadings(property);
  }

  function sortCoursesByNumber(property, aria_value) {
    if (aria_value === "none" || aria_value === "descending") {
      courses_array.sort((a,b) => a[property] - b[property]);
      document.getElementById(property).setAttribute("aria-sort", "ascending");
    } else if (aria_value === "ascending") {
      courses_array.sort((a,b) => b[property] - a[property]);
      document.getElementById(property).setAttribute("aria-sort", "descending");
    }
    const fragment = makeTableFragment(courses_array, showCourseStudents);
    courses_tbody.replaceChildren(fragment);
    resetHeadings(property);
  }

  function sortCoursesByString(property, aria_value) {
    if (aria_value === "none" || aria_value === "descending") {
      courses_array.sort((a,b) => a[property].localeCompare(b[property]));
      document.getElementById(property).setAttribute("aria-sort", "ascending");
    } else if (aria_value === "ascending") {
      courses_array.sort((a,b) => b[property].localeCompare(a[property]));
      document.getElementById(property).setAttribute("aria-sort", "descending");
    }
    const fragment = makeTableFragment(courses_array, showCourseStudents);
    courses_tbody.replaceChildren(fragment);
    resetHeadings(property);
  }

  function resetHeadings(property) {
    const headers = document.getElementsByTagName('th');
    for (let header of headers) {
      if (header.id !== property) {
        header.setAttribute("aria-sort", "none");
      }
    }
  }
  // =========== end of helper functions for user-interface ====

  return self;
} // end of createInterfaceAPI factory function
That file is also unchanged from the last lesson.
Here is the code for app_main.mjs:
import createInterfaceAPI from "./ui_renderer.mjs";
import createDatabaseAPI from "./api_client.mjs";

if (document.readyState === "loading") {
  document.addEventListener('DOMContentLoaded', init);
} else {
  init();
}

function init() {
  console.log('init called');
  const courses_div = document.getElementById("courses_div");
  courses_div.style.display = "none";
  const students_div = document.getElementById("students_div");
  const dbAPI = createDatabaseAPI();
  console.log('dbAPI', dbAPI);
  //dbAPI.initDB();
  const uiAPI = createInterfaceAPI(dbAPI);
  const courses_button = document.getElementById("courses_button");
  courses_button.addEventListener("click", () => {
    uiAPI.switchToCourses(courses_div, students_div);
  });
  const students_button = document.getElementById("students_button");
  students_button.addEventListener("click", () => {
    uiAPI.switchToStudents(courses_div, students_div);
  });
  uiAPI.initHeaders(courses_div, students_div);
  uiAPI.switchToStudents(courses_div, students_div);
}
This file is also unchanged from the last lesson.
Here is the code api_client.mjs:
export default function createDatabaseAPI() {
  //private values
  const self = {
    getAllStudents,
    getAllCourses,
    getStudentCourses,
    getCourseStudents
  };

  // ============== API functions =========================
  async function getAllStudents() {
    try {
      const response = await fetch('/api/students');
      const data = await (response.json());
      return data;
    } catch (err) {
      console.error("Error fetching students", err);
      return null;
    }
  }

  async function getAllCourses() {
    try {
      const response = await fetch('/api/courses');
      const data = await (response.json());
      return data;
    } catch (err) {
      console.error("Error fetching courses", err);
      return null;
    }
  }

  async function getStudentCourses(id) {
    try {
      const response = await fetch(`/api/students/${id}`);
      const data = await (response.json());
      return data;
    } catch (err) {
      console.error("Error fetching courses for student", err);
      return null;
    }
  }

  async function getCourseStudents(id) {
    try {
      const response = await fetch(`/api/courses/${id}`);
      const data = await (response.json());
      return data;
    } catch (err) {
      console.error("Error fetching students for course", err);
      return null;
    }
  }
  // ============== end of API functions ==================

  return self;
}
This is the same file as we wound up with in the previous lesson.
Initializing database tables and data
Connect to your Neon Cloud account. In the left sidebar, you can click on Projects. Select project.
This will bring up the Project dashboard. On the left sidebar of the dashboard, click on SQL Editor.
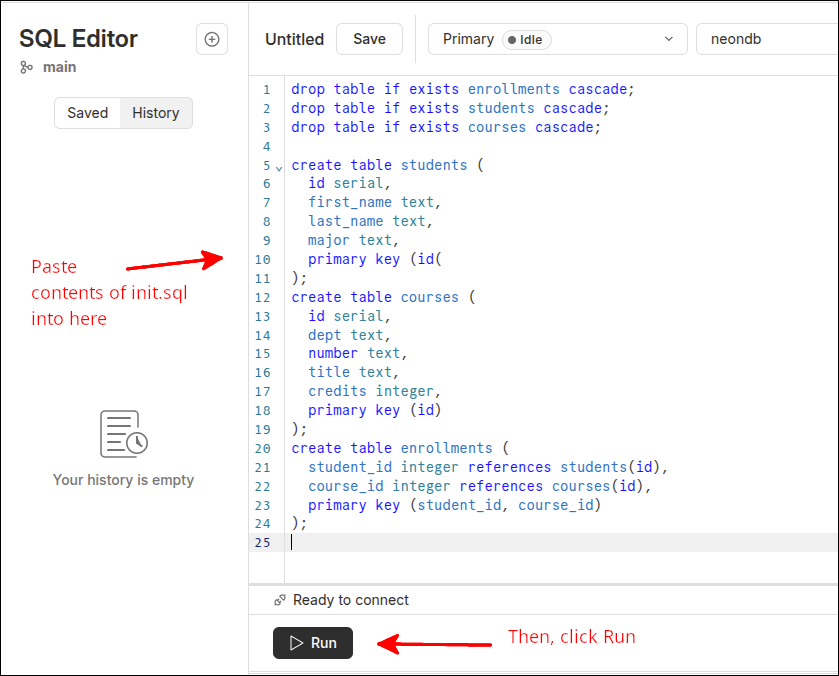
Copy the following file and paste into the text area.
drop table if exists enrollments cascade;
drop table if exists students cascade;
drop table if exists courses cascade;

create table students (
  id serial,
  first_name text,
  last_name text,
  major text,
  primary key (id)
);
create table courses (
  id serial,
  dept text,
  number text,
  title text,
  credits integer,
  primary key (id)
);
create table enrollments (
  student_id integer references students(id),
  course_id integer references courses(id),
  primary key (student_id, course_id)
);
This ran successfully as shown next:
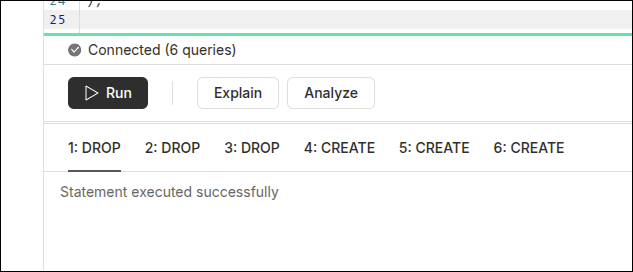
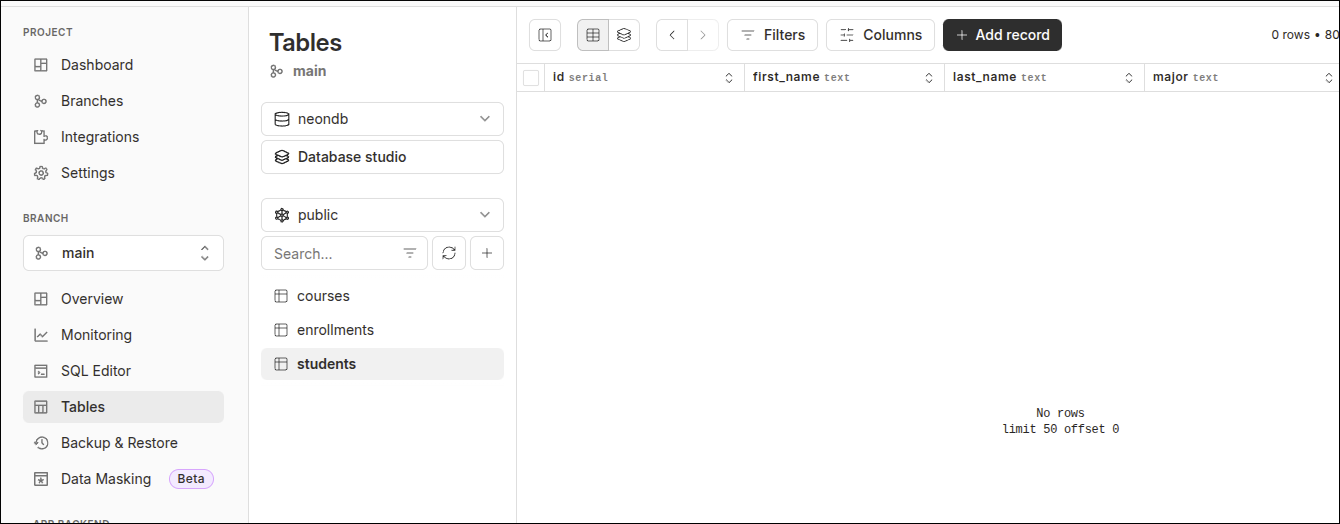
If you click on Tables on the left side, you can see that the tables were created. The screen shot below shows the students table being highlighted.
Loading some initial data
Go back to the SQL Editor. Copy the following file into the text area and click on Run.
insert into students (first_name, last_name, major) values
  ('Jane', 'Doe', 'MATH'),
  ('John', 'Doe', 'CHEM'),
  ('Alice', 'Brown', 'BIOL'),
  ('Mason', 'Jones', 'MATH'),
  ('Mary', 'Rogers', 'CHEM'),
  ('Carol', 'Greene', 'BIOL'),
  ('Jill', 'Manning', 'CHEM'),
  ('George', 'Hill', 'MATH'),
  ('Alicia', 'Smith', 'CHEM'),
  ('Robert', 'Cook', 'BIOL');

insert into courses (dept, number, title, credits) values
  ('BIOL', '100', 'Intro to Biology', 3),
  ('BIOL', '200', 'Biology II', 4),
  ('CHEM', '100', 'Intro to Chemistry', 3),
  ('CHEM', '110', 'Chemistry for Non-majors', 3),
  ('MATH', '110', 'Math for Non-science majors', 3),
  ('MATH', '205', 'Calculus I', 4),
  ('MATH', '205a', 'Calculus for Chemistry majors', 4),
  ('MATH', '205b', 'Calculus for Biology majors', 4),
  ('MATH', '206', 'Calculus II', 3),
  ('ENG', '100', 'Expository Writing', 3);

insert into enrollments (student_id, course_id) values
  (1, 1),
  (1, 4),
  (1, 6),
  (1, 10),
  (2, 1),
  (2, 3),
  (2, 7),
  (3, 2),
  (3, 4),
  (3, 8),
  (3, 10),
  (4, 1),
  (4, 4),
  (4, 6),
  (5, 1),
  (5, 3),
  (5, 7),
  (5, 10),
  (6, 2),
  (6, 4),
  (6, 8),
  (6, 10),
  (7, 1),
  (7, 3),
  (7, 7),
  (8, 1),
  (8, 4),
  (8, 6),
  (8, 10),
  (9, 1),
  (9, 3),
  (9, 7),
  (10, 1),
  (10, 4),
  (10, 6);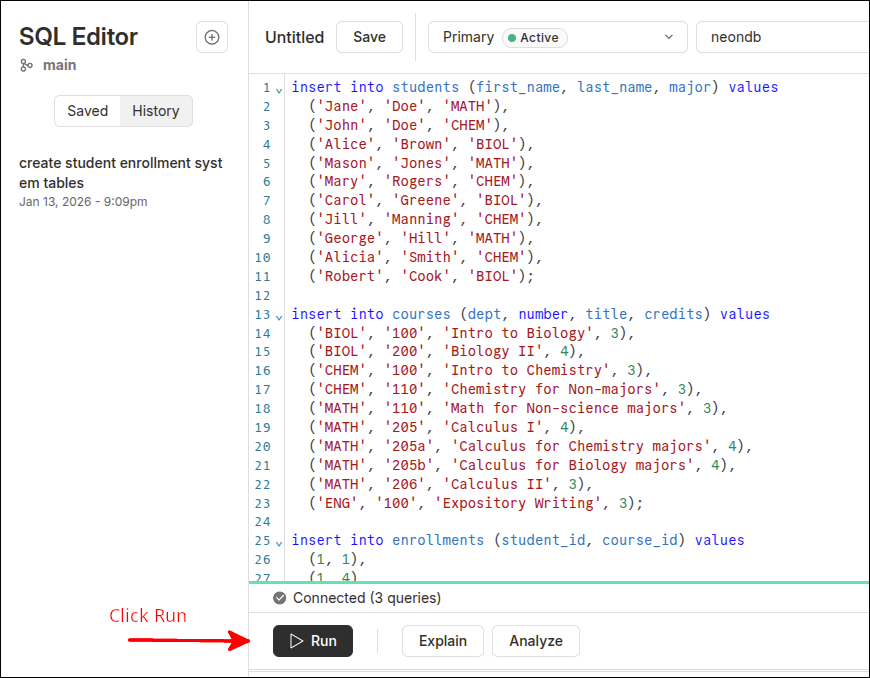
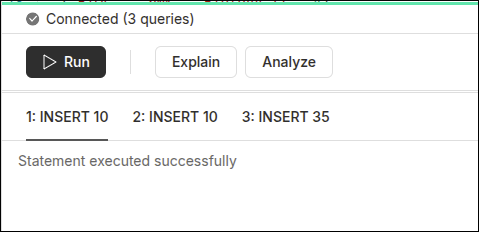
You should see that the statement was executed successfully.
Running some queries
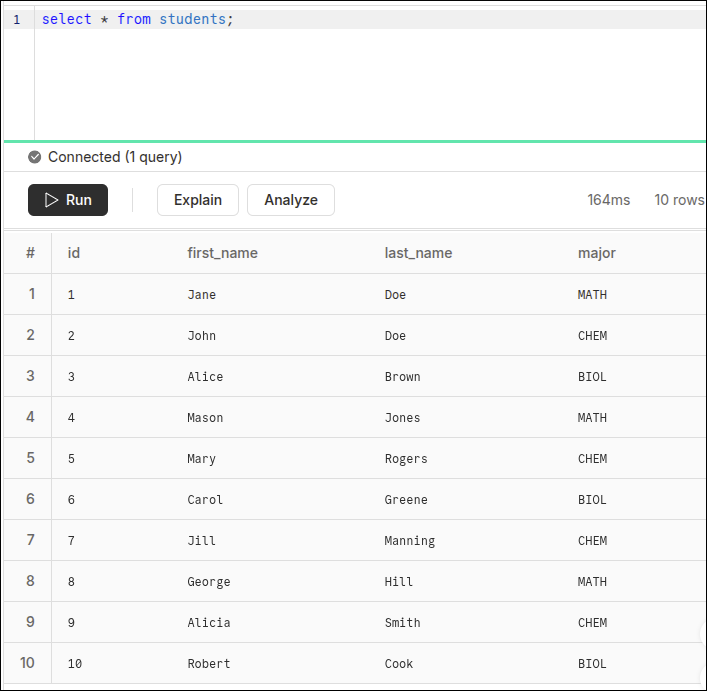
select * from students;You should see something like this:
Here is another query:
select * from courses;You should see something like this:
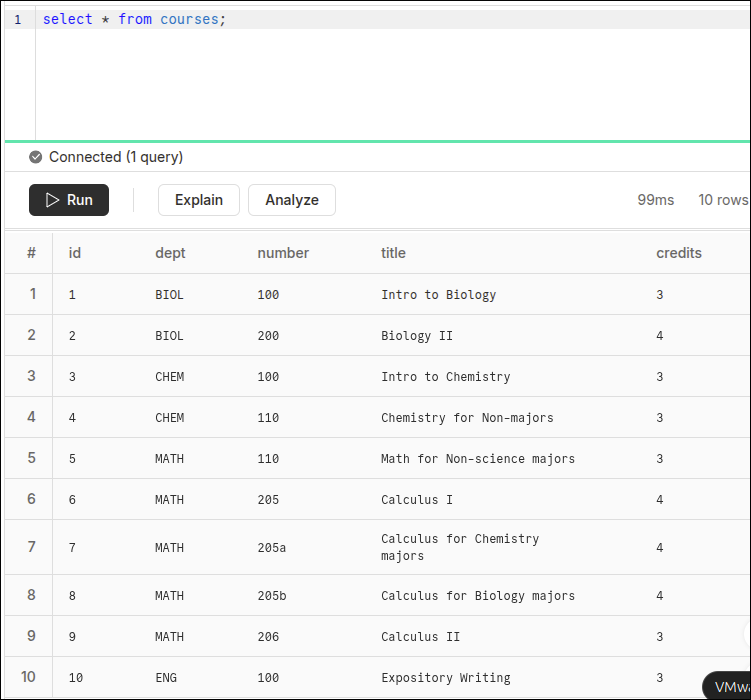
These queries show that you have some data to work with in the database provided by the Neon cloud.
Create views
Now that we can display all the students and all the courses, we want to be able to display all of a given student’s courses, as well as display all of a course’s students. This involves queries that use multiple tables. To make it easier to perform this type of query, we can go to the actual database and create some views.
The following shows the SQL code to create a student_enrollments_view and a course_students_view. The student_enrollments_view joins the students table to the courses table using the enrollments table as the "glue". The course_students_view also joins the "courses" table with the students table using enrollments as the "glue". Both of these views make use of aliases. When you see the keyword as, this is defining an alias. Aliases make the SQL code shorter, but more importantly are required when you have the same field names in more than one table. The students table and the courses table both have a field named id. So when specifying that field, you need to use an alias. Otherwise, the SQL statement will be rejected.
Here is the SQL code that we will use to create the student_enrollments_view. This is a view that we will use to see which courses a student is enrolled in.
create view student_enrollments_view as
  select S.id as sid, S.first_name, S.last_name, S.major,
  C.id as cid, C.dept, C.number, C.title, C.credits
  from students as S join enrollments as E on S.id=E.student_id
  join courses as C on E.course_id=C.id;
Let’s break down this view. On line 1, we have a line that has this syntax:
create view <view_name> as
So, the words create and view are predefined terms, that means you are trying to create a view. What follows is the name you want to give to that view. I usually end the name of a view with _view so that I know that this is a view. At the end of the line is as. This means that everything that follows will be the definition of what that view will be.
Lines 2-5 complete the definition of the view. Let’s look at lines 2 and 3, since they are both just specifying the field names that the view will include. It has this syntax, where you put the table name a dot (.) and then the field name. Each tablename.fieldname is separated by a comma.
select S.id, S.first_name, S.last_name, S.major, C.id, C.dept, C.title, C.credits
There is no comma after the last field. But, notice that the id field shows up twice. So, we need to use aliases to allow this SQL instruction to work. So, this becomes:
select S.id as sid, S.first_name, S.last_name, S.major C.id as cid, C.dept, C.number, C.title, C.credits
You can break the instruction into multiple lines if there are a lot of fields. The S and C represent the names of the tables. They are actually aliases that will be defined on lines 4 and 5. On line 4, you see the phrase students as S. This means that S is an alias for students. This means,
S.id as sid
is equivalent to:
students.id as sid
And, sid is an alias for students.id or S.id. The use of the sid alias helps get around the fact that the id field shows up in both the students and courses tables.
This means that,
C.id as cid and later on courses as C
are saying cid is an alias for courses.id or C.id
Without using aliases for the table names, lines 2 and 3 would look like this:
select students.id as sid, students.first_name, students.last_name, students.major
courses.id as cid, courses.dept, courses.number, courses.title, courses.credits
So, if you use aliases for table names, it does make the SQL instructions more compact.
Line 4 is the start of stating where those fields must be selected from. Obviously we cannot select things like C.dept from students. That is where we need to join in the courses table. But, we cannot just join the students table to the courses table. That would be what is called a many to many relationship. A student can take many courses. Each course can have many students. So just joining those two tables would be a many to many relationship. The enrollments table specifies which student is taking which course. So, the enrollments table is often called a bridge or join table. So, we can think of the enrollments table as the glue that sticks the students and courses table together correctly.
So, line 4 has a syntax like this:
from <table1> join <table2> on <table1>.<matching_field>=<table2>.<matching_field>
The <matching_field> does not need to have the same name in both tables. In fact, it usually is not the same name, but the matching_fields must have the same meaning in both tables. If we rewrite line 4 without the aliases for table names, it would look like this:
from students join enrollments on students.id=enrollments.student_idActually line 4 and line 5 are connected as they are both specifying the from part of the query. If you were to write the syntax of both of those lines together it would look like this:
from table1 join table2 on table1.mf1=table2.mf1 join table3 on table2.mf2=table3.mf2
So, table2 is the bridge table joining table1 and table3.
Here is the other view that we will be creating. It is similar except that we will use this view to see the students that are enrolled in a course.
create view course_enrollments_view as
  select C.id as cid, C.dept, C.number, C.title, C.credits,
  S.id as sid, S.first_name, S.last_name, S.major
  from courses as C join enrollments as E on C.id=E.course_id
  join students as S on E.student_id=S.id;
Entering the views into the backend database
Let’s go to our Neon account and use the SQL Editor to add these views, and then show some examples of querying these views. Start by logging in to your Neon account. Select your project, the click on SQL Editor on the left menu.
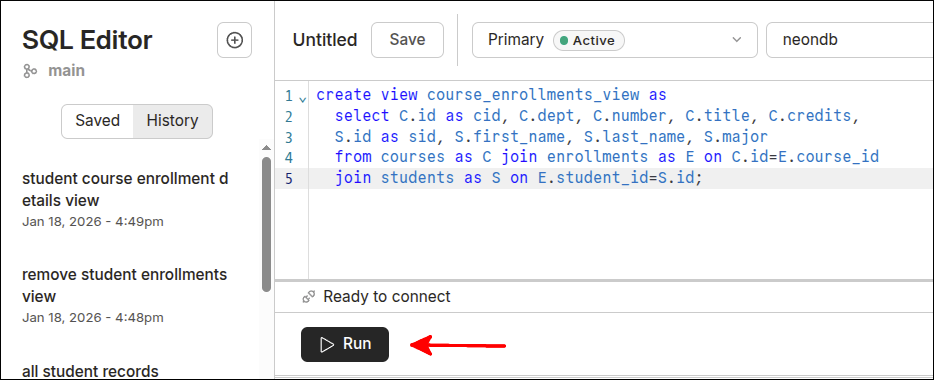
In the screen shot below, I have copied and pasted the SQL to create the student_enrollments_view into the text area. I will then click on the Run button.
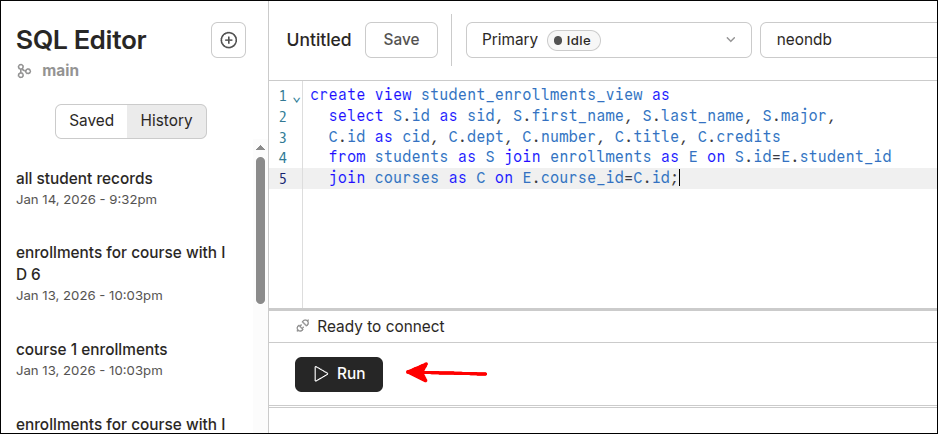
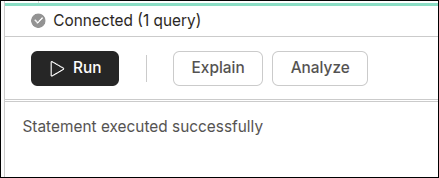
After clicking on the Run button, the message shows that the view was created.
Next, we can create the course_enrollments_view. The following screen shot shows the code pasted into the text area, where the Run button is about to be clicked.
This shows that the view was created.
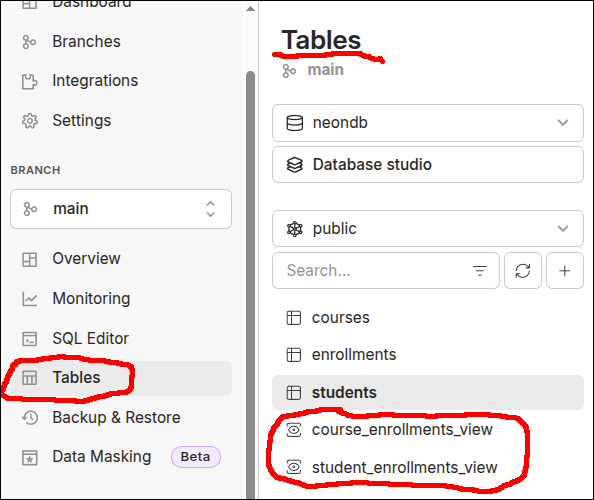
On the left menu, you can select Tables. This will show you that those views were saved as tables.
With those views created, we can return to SQL Editor and query those views. Here are some examples:
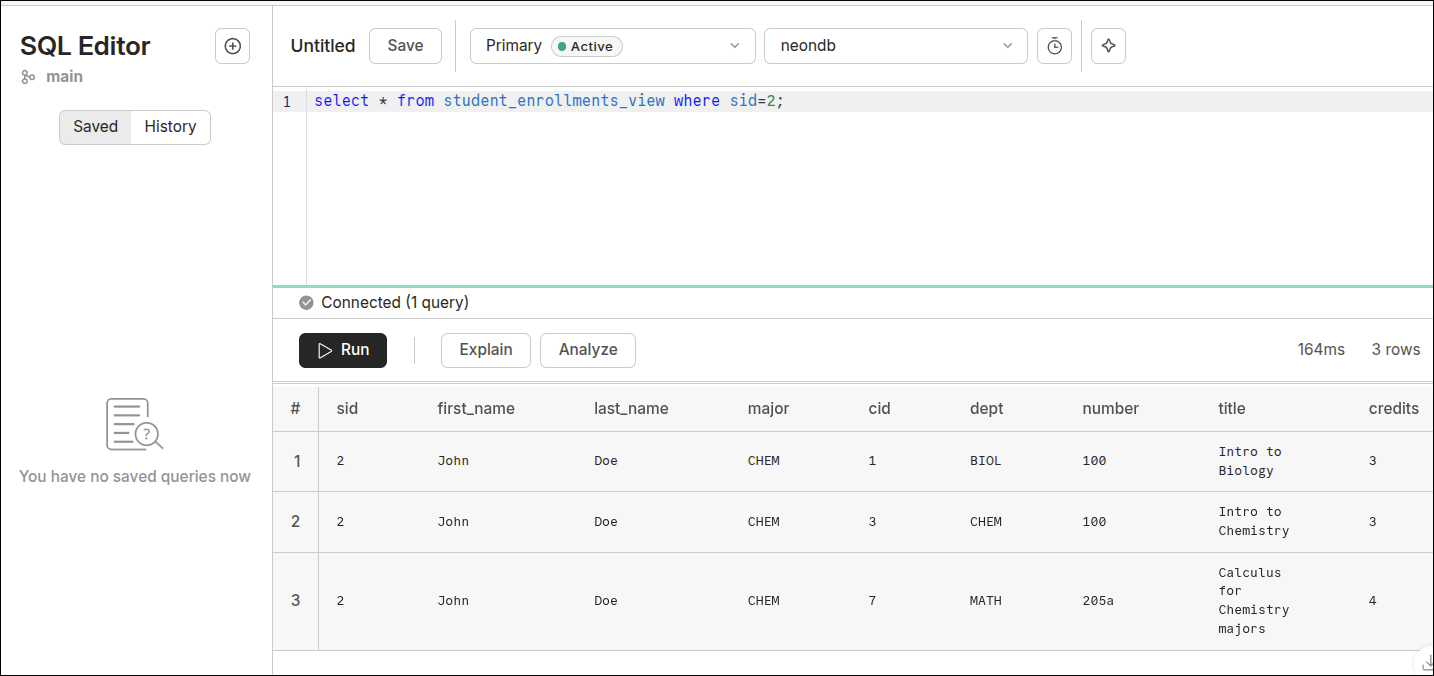
So, the query executed was:
select * from student_enrollments_view where sid=2;This returned 3 records, that show that John Doe is enrolled in BIOL 100, CHEM 100 and MATH 205a. Note the field names in the heading row of the results table. Since we used the alias students.id as sid, then sid shows up as the field name. So, John Doe’s id is 2.
To convince you that the views are helpful, this is what the SQL query would look like without any views.
select students.id as sid, first_name, last_name, major, courses.id as cid,
  dept, number, title, credits from
  students join enrollments on students.id=enrollments.student_id
  join courses on enrollments.course_id=courses.id where students.id=2;
As you can see, querying the view is much easier. Also, note that when a field name shows up in only one table, you don’t have to put the table_name before the field_name.
Here is another example that queries the course_enrollments_view to see which students are in CHEM 100 (cid=3):
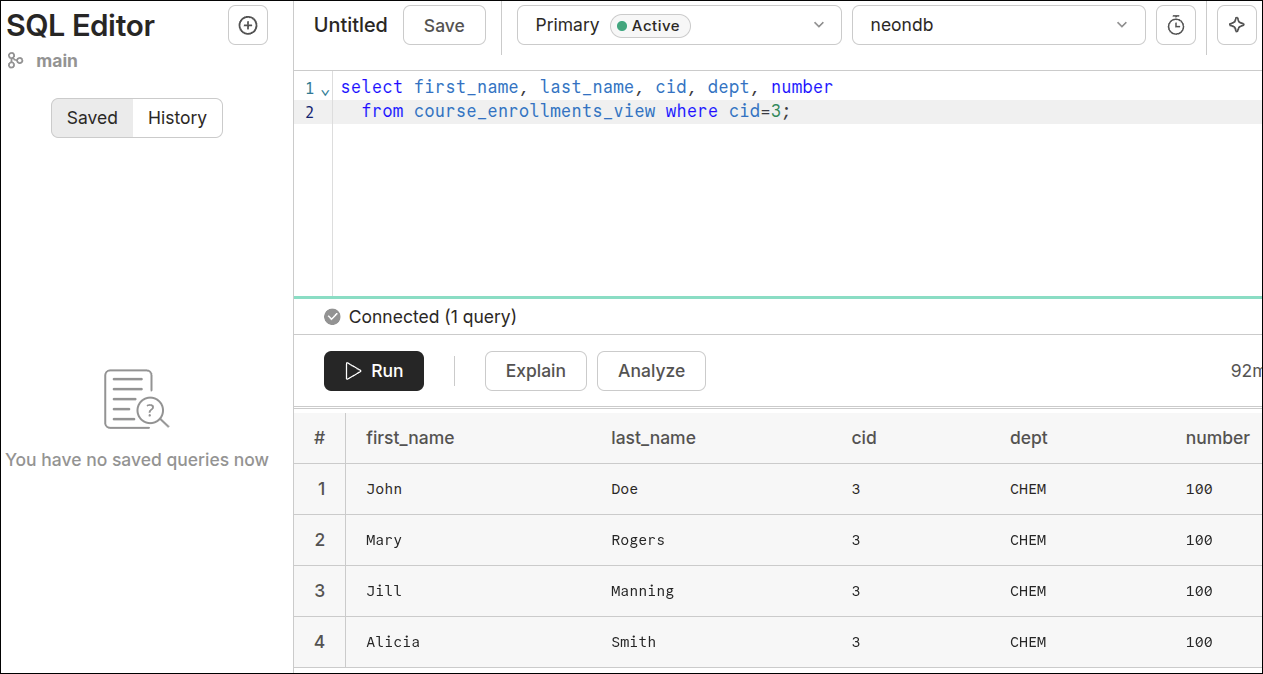
As you can see, there are 4 students enrolled in CHEM 100.
Source code for files in main (root) folder
Here is the code for the configuration file vite.config.js:
export default {
  root: 'public',
  server: {
    proxy: {
      '/api': 'http://localhost:3000' // Your Express port
    }
  }
}
This makes it so that the Express port can be referenced using the proxy '/api', instead of 'http://localhost:3000'.
Now that we have the backend database all set up, it is time to start working on the middleware. Remember, we always start at the backend to make sure that the appropriate data is in the database and can be queried directly. This way, when you are developing the middleware and something goes wrong, you know the problem is in the middleware. So, now we get to the file that runs the application server that uses Express. Here is the the starting code for server.mjs:
import 'dotenv/config';
import express from 'express';
import cors from 'cors';
import { Pool, neonConfig } from '@neondatabase/serverless';

// This bypasses pg-protocol SSL code in Node v20.19.
neonConfig.poolQueryViaFetch = true;

const pool = new Pool({
  connectionString: process.env.DATABASE_URL,
  ssl: {
    rejectUnauthorized: false,
  },
});

const app = express();

app.use(cors());
app.use(express.json());
app.use(express.static('public'));

app.get('/api', async (req, resp) => {
  resp.json({ message: 'Express and PostgreSQL'});
});
app.get('/api/students', async (req, resp) => {
  try {
    const result = await pool.query('SELECT * FROM students');
    const payload = JSON.stringify(result.rows);
    resp.statusCode = 200;
    resp.setHeader('Content-Type', 'application/json');
    resp.send(payload);
  } catch (err) {
    console.error('Database Error:', err.message);
    resp.status(500).send('Internal Server Error');
  }
});

const PORT = 3000;
app.listen(PORT, () => {
  console.log(`Backend server ready at http://localhost:${PORT}`);
});
This server.mjs file is the file that has been changed because this is the file that interacts directly with the backend database. So, the changes we make here are to take into account the following:
-
Differences between the pg driver and the sqlite3 driver.
-
Changes needed to be made for StackBlitz. StackBlitz uses web containers, and those are not made to interact with external databases. So using code like
resp.json()will result in errors. So, we need to use a workaround to send the equivalent response without usingresp.json()
Line 4 is the first important change. Using the Pool module and neonConfig module from @neondatabase/serverless are what allows connecting to the external database being hosted by Neon Cloud.
Lines 9-14 provide the connection to the external database, and store this connection as pool.
Lines 16-20 are basically the same as from the server.mjs file we used in the last lesson. Line 16 creates the Express application, and stores this as app. Line 18 prevents the CORS (Common Origin Resource Sharing) errors that would result because the express server in on port 3000, and the webpage front end is served on a different port. Line 17 enables the middleware that transforms data in the request into the required JSON format. Line 20 makes it so that Express serves out the front webpage.
Lines 22-24 define the default route. This route is just to test if Express is running properly. Note on line 23 that resp.json() is used. This is okay, because this route does not actually connect to the external database.
Lines 25-36 define a route and route handler that will be used to get all the records from the students database table. Line 25 defines the route that along with vite.config.js will mean that this route is accessed using fetch('/api/students'). If we were using curl to test this route, we would still need to do this:
$ curl http://localhost:3000/api/studentsThat’s because the curl command runs outside of app, so it is not affected by vite.config.js.
Lines 25-32 define the route handler as an anonymous async function with the parameters (req, resp). The parameter req refers to the request that has been transformed by Express, and resp refers to the response that Express will send back to Node.js' HTTP server. Lines 26-32 define a try block that will attempt to get all the records from the students table. Line 27 shows the query that is being performed, 'SELECT * from students'. This query must be awaited as it takes time to process. Line 28 calls JSON.stringify() to convert the result into JSON format. Line 29 adds a header that sets the status code to 200. Line 30 adds another header that identifies the content as being JSON formatted. Line 31 uses send() to send the JSON formatted result along with the headers back to the HTTP server that forwards this to the frontend (web browser). Lines 32-35 deal with any errors that occur in executing the try block. Note that on line 34 we use:
resp.status(500).send('Internal Server Error');This is used instead of:
resp.status(500).json({ message: 'Internal Server Error'});That is because calling .json() will cause errors when dealing with data from the backend database. If we were only developing locally, this would not be necessary.
Lines 38-41 just start up the server just as similar lines were used in the last lesson.
Starting up the application
Now that you have all the files with their starting content, here are the commands you need to start the application so we can test and work on it.
Starting up application in StackBlitz
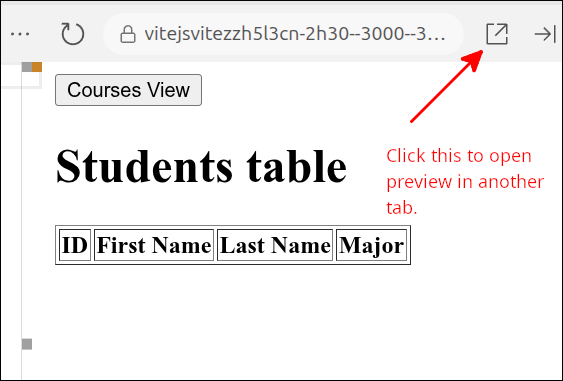
After putting in the files as shown above, the StackBlitz project should show a preview of the application. If not, go back to the Dashboard and start the project up again. This should show the application in Preview. You can click on the square icon with the arrow pointing to the upper right corner to open the preview in another tab:
When the tab opens, click on the Connect to Project button. You should be all set at this point.
Modifying server.mjs
All that remains now is to modify server.mjs so that it provides the routes needed by the API functions in api_client.mjs. So, let’s work on the route that is needed to get all the courses.
Getting all the courses
Here is the new version of server.mjs that will define a route to get all the courses.
import 'dotenv/config';
import express from 'express';
import cors from 'cors';
import { Pool, neonConfig } from '@neondatabase/serverless';

// This bypasses pg-protocol SSL code in Node v20.19.
neonConfig.poolQueryViaFetch = true;

const pool = new Pool({
  connectionString: process.env.DATABASE_URL,
  ssl: {
    rejectUnauthorized: false,
  },
});

const app = express();

app.use(cors());
app.use(express.json());
app.use(express.static('public'));

app.get('/api', async (req, resp) => {
  resp.json({ message: 'Express and PostgreSQL'});
});
app.get('/api/students', async (req, resp) => {
  try {
    const result = await pool.query('SELECT * FROM students');
    const payload = JSON.stringify(result.rows);
    resp.statusCode = 200;
    resp.setHeader('Content-Type', 'application/json');
    resp.send(payload);
  } catch (err) {
    console.error('Database Error:', err.message);
    resp.status(500).send('Internal Server Error');
  }
});
app.get('/api/courses', async (req, resp) => {
  try {
    const result = await pool.query('SELECT * FROM courses');
    const payload = JSON.stringify(result.rows);
    resp.statusCode = 200;
    resp.setHeader('Content-Type', 'application/json');
    resp.send(payload);
  } catch (err) {
    console.error('Error getting courses', err.message);
    resp.status(500).send("Server error getting courses");
  }
});

const PORT = 3000;
app.listen(PORT, () => {
  console.log(`Backend server ready at http://localhost:${PORT}`);
});
The new lines are 37-48. Lines 37-48 define the route and route handler for getting all the records from the courses database table. If you compare this to the route for getting all the students on lines 25-36, the route for getting all the courses is very similar. The main difference is on line 39, where the query is 'SELECT * FROM courses'. The error messages are also changed to reflect that this is an attempt to get the courses instead of the students.
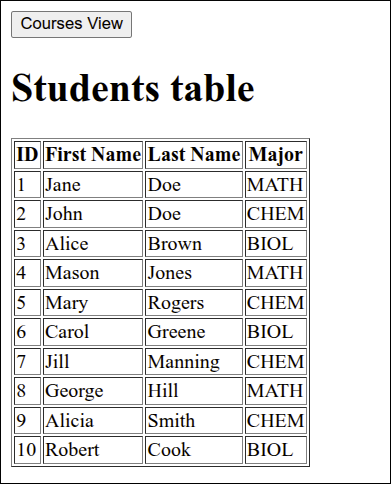
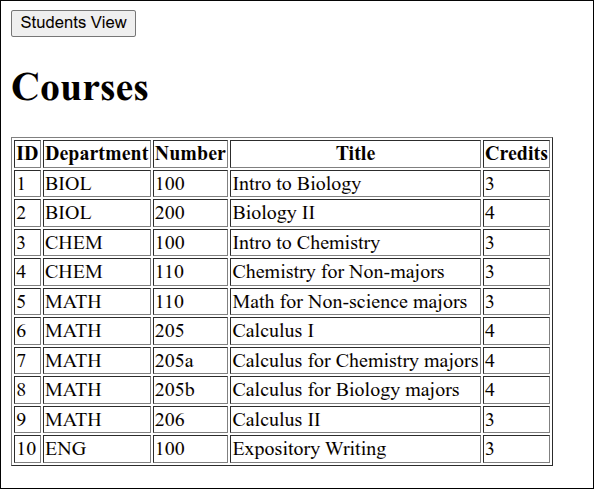
With this change, you can go to the application and click on the Courses View button and you will see all the courses show up:
Getting all of a student’s courses
Next, we can modify server.mjs to get all the courses a student is enrolled in. Here is the next version of server.mjs:
import 'dotenv/config';
import express from 'express';
import cors from 'cors';
import { Pool, neonConfig } from '@neondatabase/serverless';

// This bypasses pg-protocol SSL code in Node v20.19.
neonConfig.poolQueryViaFetch = true;

const pool = new Pool({
  connectionString: process.env.DATABASE_URL,
  ssl: {
    rejectUnauthorized: false,
  },
});

const app = express();

app.use(cors());
app.use(express.json());
app.use(express.static('public'));

app.get('/api', async (req, resp) => {
  resp.json({ message: 'Express and PostgreSQL'});
});
app.get('/api/students', async (req, resp) => {
  try {
    const result = await pool.query('SELECT * FROM students');
    const payload = JSON.stringify(result.rows);
    resp.statusCode = 200;
    resp.setHeader('Content-Type', 'application/json');
    resp.send(payload);
  } catch (err) {
    console.error('Database Error:', err.message);
    resp.status(500).send('Internal Server Error');
  }
});
app.get('/api/courses', async (req, resp) => {
  try {
    const result = await pool.query('SELECT * FROM courses');
    const payload = JSON.stringify(result.rows);
    resp.statusCode = 200;
    resp.setHeader('Content-Type', 'application/json');
    resp.send(payload);
  } catch (err) {
    console.error('Error getting courses', err.message);
    resp.status(500).send("Server error getting courses");
  }
});
app.get('/api/students/:sid', async (req, resp) => {
  const { sid } = req.params;
  try {
    const result = await pool.query(
      'select * from student_enrollments_view where sid=$1', [sid]);
    const payload = JSON.stringify(result.rows);
    resp.statusCode = 200;
    resp.setHeader('Content-Type', 'application/json');
    resp.send(payload);
  } catch (err) {
    console.error("Error getting student's courses", err.message);
    resp.status(500).send("Server error getting student's courses");
  }
});

const PORT = 3000;
app.listen(PORT, () => {
  console.log(`Backend server ready at http://localhost:${PORT}`);
});
The new lines are 49-61. Lines 49-64 define the route and route handler for getting all the courses a student is enrolled in. Note that the route is defined so that if using fetch(), you can just use fetch(/api/students/2) if you are trying to get the courses for the student with an id = 2. If testing this route you need to use:
http://localhost:3000/api/students/2Lines 50 and 53 are the main lines that are different from the previous routes. Since the URL will contain the student’s id, line 50 is used to get that value from the URL. Actually, line 50 gets the the parameters formatted as JSON and stores this as sid. Line 53 performs the following query:
select * from course_enrollments_view where sid=2;Note that line 53 uses a parameterized query that will bind the filtered value of the variable sid in to the query where the placeholder $1 is located. The parameterized query prevents SQL Injection as talked about in the last lesson.
With those changes, you can now click on a student and see the courses they are enrolled in:

Getting all the students enrolled in a course
The last route we need to define is the one that gets all the students enrolled in a given course. Here is the next version of server.mjs:
import 'dotenv/config';
import express from 'express';
import cors from 'cors';
import { Pool, neonConfig } from '@neondatabase/serverless';

// This bypasses pg-protocol SSL code in Node v20.19.
neonConfig.poolQueryViaFetch = true;

const pool = new Pool({
  connectionString: process.env.DATABASE_URL,
  ssl: {
    rejectUnauthorized: false,
  },
});

const app = express();

app.use(cors());
app.use(express.json());
app.use(express.static('public'));

app.get('/api', async (req, resp) => {
  resp.json({ message: 'Express and PostgreSQL'});
});
app.get('/api/students', async (req, resp) => {
  try {
    const result = await pool.query('SELECT * FROM students');
    const payload = JSON.stringify(result.rows);
    resp.statusCode = 200;
    resp.setHeader('Content-Type', 'application/json');
    resp.send(payload);
  } catch (err) {
    console.error('Database Error:', err.message);
    resp.status(500).send('Internal Server Error');
  }
});
app.get('/api/courses', async (req, resp) => {
  try {
    const result = await pool.query('SELECT * FROM courses');
    const payload = JSON.stringify(result.rows);
    resp.statusCode = 200;
    resp.setHeader('Content-Type', 'application/json');
    resp.send(payload);
  } catch (err) {
    console.error('Error getting courses', err.message);
    resp.status(500).send("Server error getting courses");
  }
});
app.get('/api/students/:sid', async (req, resp) => {
  const { sid } = req.params;
  try {
    const result = await pool.query(
      'select * from student_enrollments_view where sid=$1', [sid]);
    const payload = JSON.stringify(result.rows);
    resp.statusCode = 200;
    resp.setHeader('Content-Type', 'application/json');
    resp.send(payload);
  } catch (err) {
    console.error("Error getting student's courses", err.message);
    resp.status(500).send("Server error getting student's courses");
  }
});
app.get('/api/courses/:cid', async (req, resp) => {
  const { cid } = req.params;
  try {
    const result = await pool.query(
      'select * from course_enrollments_view where cid=$1', [cid] );
    const payload = JSON.stringify(result.rows);
    resp.statusCode = 200;
    resp.setHeader('Content-Type', 'application/json');
    resp.send(payload);
  } catch (err) {
    console.error("Error fetching student in course", err.message);
    resp.status(500).send("Error fetching students in course");
  }
});

const PORT = 3000;
app.listen(PORT, () => {
  console.log(`Backend server ready at http://localhost:${PORT}`);
});
The new lines are 63-76. Lines 63-76 define the route and route handler that get the students enrolled in a given course. This is very similar to the route and route handler defined on lines 49-61. The main differences are on lines 64 and 67. Line 64 gets cid from the JSON formatted data from the URL. Line 67 runs this query:
select * from course_enrollments_view where cid=1if the course selected has a cid = 1.
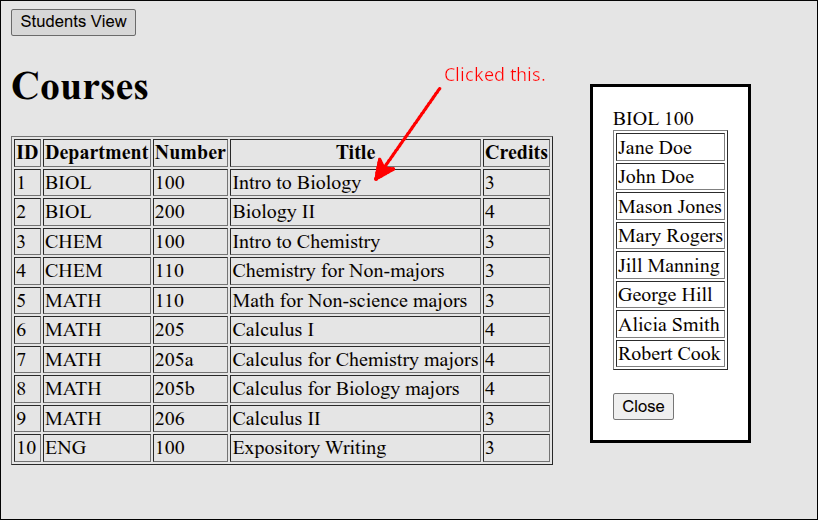
If you go to the application and refresh the browser, you can see this if you switch to the courses view and click on the first course:
This completes this lesson
Summary
-
We made use of a different external database for this lesson. This was a PostgreSQL database provided by Neon Cloud. Connecting to this cloud database required the use of a special connection string.
-
We reused a lot of the code from the previous lesson: Using Sqlite3 as an external database. This demonstrated the value of using modules and API functions that could be reused. As a result, the only code changes had to do with the server.mjs file. That is where the code that applied specifically to the different database is located.
-
PostgreSQL is another SQL-based database management system. So, this lesson provided a review of using SQL commands to create the database tables and populate those tables with data. That part of the lesson was very similar to setting up the database in the previous lesson. As with that lesson, views were used to simply querying tables that are linked (related).
-
When writing code for server.mjs, we had to do this in a way that would work for both StackBlitz and a locally developed Vite project. This is because the web containers used by StackBlitz have security measures that generally don’t support the use of external databases.